Contributing To A Git Repository on GitHub
Recently I’ve been contributing a lot of code to open source projects on GitHub. In particular, I’ve been contributing to the AngularJS extension set, ngCordova, for Ionic Framework. When I first started contributing it was a scary process, mostly because I had only ever used Git for solo projects. I have used it for team projects, but for the majority it was my own personal projects.
In this guide, you’ll see how to contribute to an already existing, open source project on GitHub.
Before we begin, we’re going to need to pick a project we want to contribute to. To keep the example going and to encourage people to contribute to this particular project, this is going to be very ngCordova oriented. Our process flow is going to be broken into the following events:
- Forking the ngCordova project on GitHub
- Creating a development branch for all local project changes
- Fetching / pulling from the upstream / official project
- Submitting a pull request to merge our changes into the upstream / official project
An unofficial step you should take is asking the official repository owner what their rules are for pull requests. Often you might find rules in regards to code formatting or documentation policies. With that said, lets go ahead and start each of these steps.
Forking the ngCordova project on GitHub
Before we can start contributing to a project, we need to first fork it so we have our own isolated version of the project. This can be done by visiting the project page and clicking the fork button.

When you fork ngCordova, instead of saying driftyco/ng-cordova it will say something like nraboy/ng-cordova or whatever your GitHub username is. The original repository is known as the upstream repository.
Creating a development branch for all local project changes
The general rule of thumb is to never work directly in your master branch. You want to work in a feature branch, or in our case, a development branch.
Clone the forked repository and create a new local development branch like the following:
git clone git@github.com:nraboy/ng-cordova.git
cd ng-cordova
git branch development
Fetching / pulling from the upstream / official project
Often we’ll find that when we’re working on an open source project, the upstream code is frequently changing. For larger projects the code might have changed 100 times in an hour. Because of this we need to keep up with any and all changes.
Our freshly forked repository currently has no connection to the upstream repository, so we need to go ahead and add it as one of our remotes.
From your forked repository, run the following to add the upstream:
git remote add upstream git@github.com:driftyco/ng-cordova.git
Now with the master branch as your current branch, run the following:
git fetch upstream
git merge upstream/master
The above lines will get all upstream changes and then merge the upstream/master with the local master.
If you’d rather do this with one line, you can do the following instead:
git pull upstream master
Because we are doing all our work in a development branch, don’t forget to merge these upstream changes into your development branch as well.
Submitting a pull request to merge our changes into the upstream / official project
If you haven’t already, merge all your local development changes into the local master branch of your forked repository. This can be done by doing the following:
git checkout master
git merge development
With all your changes merged into the local master, push them to GitHub:
git push origin --all
You can now use the GitHub pull request interface for making a new pull request to the upstream project.

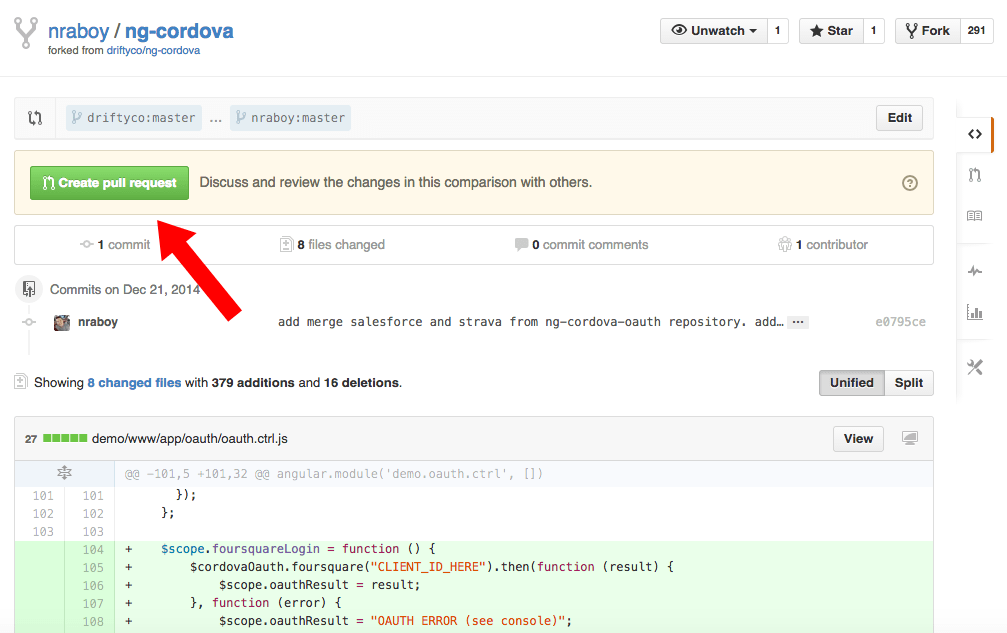
After choosing to make a new pull request, GitHub should automatically detect the changes between your forked repository and the upstream. If it does not, you’ll be given some drop downs to choose from. Once the changes are detected you should see something like this:

At this point you only need to click Create pull request and enter a comment for the upstream owner. When the upstream owner approves your merge, all your custom changes will become part of the upstream.
Conclusion
Contributing to repositories on GitHub may seem scary or complicated at first, but it really isn’t. The steps remain consistent and short.

