Process File Uploads In Node.js With Hapi Framework
When building a web application, I personally find file uploads to be the most complicated part of the job. For example, how do you accept the files, and what do you do with them after you’ve received them in the request?
Not too long ago I wrote about accepting file uploads in Node.js sent via Angular. In this example I was using Express and the Multer middleware. What if you’re interested in using one of the more modern Node.js frameworks instead of Express?
This time around we’re going to explore processing file uploads with Hapi and Node.js.
Creating a New Node.js Project with Hapi Framework
When comparing the Express solution to handling file uploads and the Hapi solution to handling file uploads, neither are very complicated. However, for simplicity, we’re going to create a new project and work our way into the example.
Create a new directory somewhere on your computer. Within this new directory, execute the following command:
npm init -y
The above command will initialize a new project by creating a package.json file within your directory. With the project initialized, we can install the appropriate dependencies.
From the command line, execute the following command:
npm install hapi --save
The only dependency in our project is hapi and it is our framework of choice for this example. No middleware like Multer is necessary when working with Hapi.
We know that we’ll be uploading files and images via our application, so we need a place to store them. Go ahead and create an uploads directory within your project. We’ll be placing all uploaded content within this directory.
Finally, create an app.js file within your project. To get the ball rolling, let’s populate our app.js file with the following boilerplate JavaScript code:
const Hapi = require("hapi");
const fs = require("fs");

const server = new Hapi.Server();

server.connection({ "host": "localhost", "port": 3000 });

server.start(error => {
    if(error) {
        throw error;
    }
    console.log("Listening at " + server.info.uri);
});
In the above snippet we’ve imported our dependencies, defined the serve location, and started the server. You’ll notice we are importing the fs dependency. This dependency will give us access to the file system and is already a part of Node.js.
Developing the Endpoint Logic and Receiving File Data
With the foundation to our project created, we can focus on developing our endpoints. In this example we’ll only have a single endpoint which will allow us to send multipart form data.
Take a look at the following JavaScript code:
server.route({
    method: "POST",
    path: "/",
    config: {
        payload: {
            output: "stream",
            parse: true,
            allow: "multipart/form-data",
            maxBytes: 2 * 1000 * 1000
        }
    },
    handler: (request, response) => {
        var result = [];
        for(var i = 0; i < request.payload["file"].length; i++) {
            result.push(request.payload["file"][i].hapi);
            request.payload["file"][i].pipe(fs.createWriteStream(__dirname + "/uploads/" + request.payload["file"][i].hapi.filename))
        }
        response(result);
    }
});
Let’s break down what is happening so it is easier to understand.
By default, Hapi is expecting requests to come in as JSON, not form data or multipart form data. We need to configure Hapi so it knows what will be coming in via the payload.
config: {
    payload: {
        output: "stream",
        parse: true,
        allow: "multipart/form-data",
        maxBytes: 2 * 1000 * 1000
    }
}
It is important that you define the maximum amount of bytes that will be coming in. By default it is a small number, so we’re increasing the max payload to be 2MB in size.
With the endpoint configured, we can process the request.
handler: (request, response) => {
    var result = [];
    for(var i = 0; i < request.payload["file"].length; i++) {
        result.push(request.payload["file"][i].hapi);
        request.payload["file"][i].pipe(fs.createWriteStream(__dirname + "/uploads/" + request.payload["file"][i].hapi.filename))
    }
    response(result);
}
The idea here is that we accept our files and return a JSON array with the file information. In the above example we’re assuming that our payload will contain a key called file and there are multiple pieces of data with the same key. In other words, all files can be accessed from the file key.
Because we have more than one file, we need to loop through them. The file data will be found at the root level of the file key, but the file information such as name will be found in the hapi property. The information in the hapi property will be returned to the client.
Each file will be piped to the fs package and saved to our uploads directory.
Making a Request that Includes File Data with Postman
We can test what we’ve done with pretty much any client facing application. Rather than building a client facing application, let’s make use of Postman.
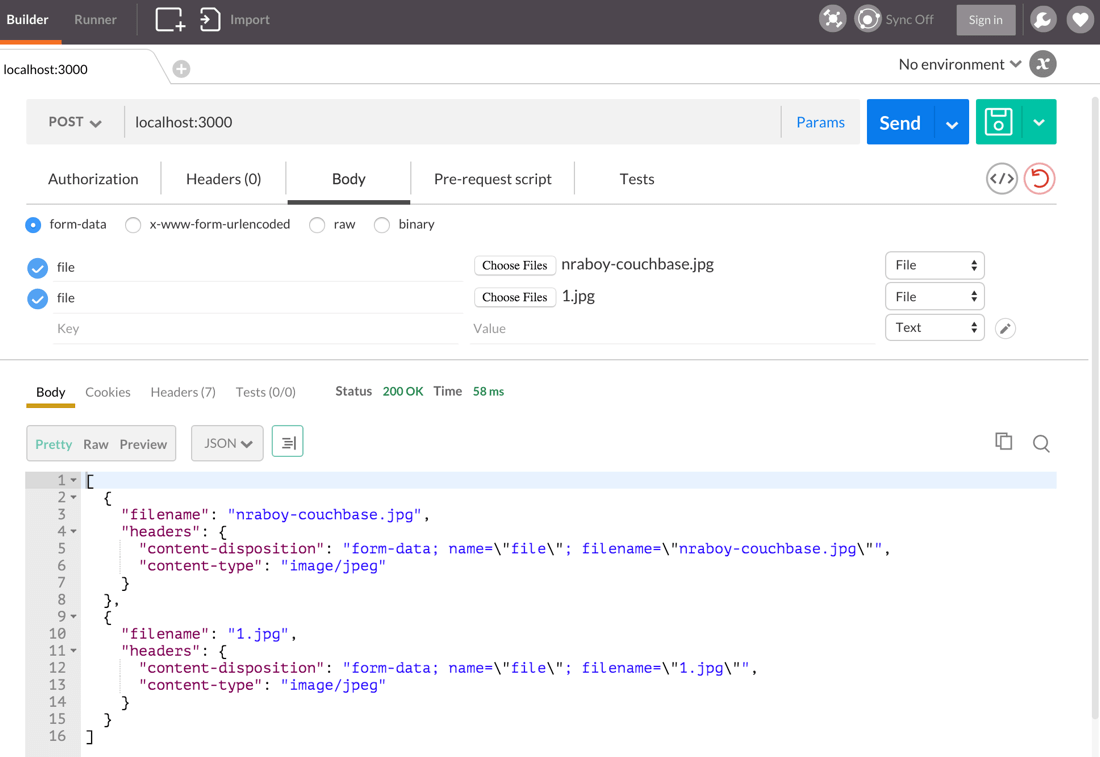
Essentially, we want to point Postman at our API endpoint and choose POST as our request method. In addition, we’ll also want to choose form-data as our request type.

When selecting data to send, make sure that the key is called file because that is what we have it as in the Hapi application.
If the request is successful, a JSON array should be returned with the file information and any files should show up in the uploads directory of our project.
Conclusion
You just saw how to handle file uploads in a Node.js web application that uses Hapi as the framework. Using Hapi is an alternative to the previous article I wrote regarding Express and Multer.
If you want to take this example to the next level, try to hook it up with an object storage service like AWS S3 or Minio. For more information, check out a previous article I wrote titled, Upload Files to a Minio Object Storage Cloud with Node.js and Multer.

