Developing A RESTful API With Node.js And MongoDB Atlas
Most modern web applications need to be able to handle data consumption requests and data manipulation requests from clients using HTTP. It is the norm to pass JSON data between these requests so it makes sense to use a NoSQL document database because JSON and similar is the common storage format, eliminating the need to marshal data to new formats in every request.
Lucky for us, leveraging these concepts and technologies is not a difficult task.
We’re going to see how to create a RESTful API using Node.js and Express Framework that communicates to a cloud instance of MongoDB called Atlas.
Deploy a NoSQL Database with MongoDB Atlas
For this tutorial we’re going to be using MongoDB as our NoSQL database. Instead of provisioning our own server, we’re going to configure a cloud instance using MongoDB Atlas. As part of the configuration process, we’re going to whitelist certain hosts and define user roles in an effort to harden the security of our database.
Create a New Cluster in the Cloud
As the first step, we need to deploy an instance of MongoDB using Atlas. If you’re not already registered to use Atlas, head over to the getting started page, otherwise you can sign in.
The first step in the deployment process will be to choose a cloud provider and region.
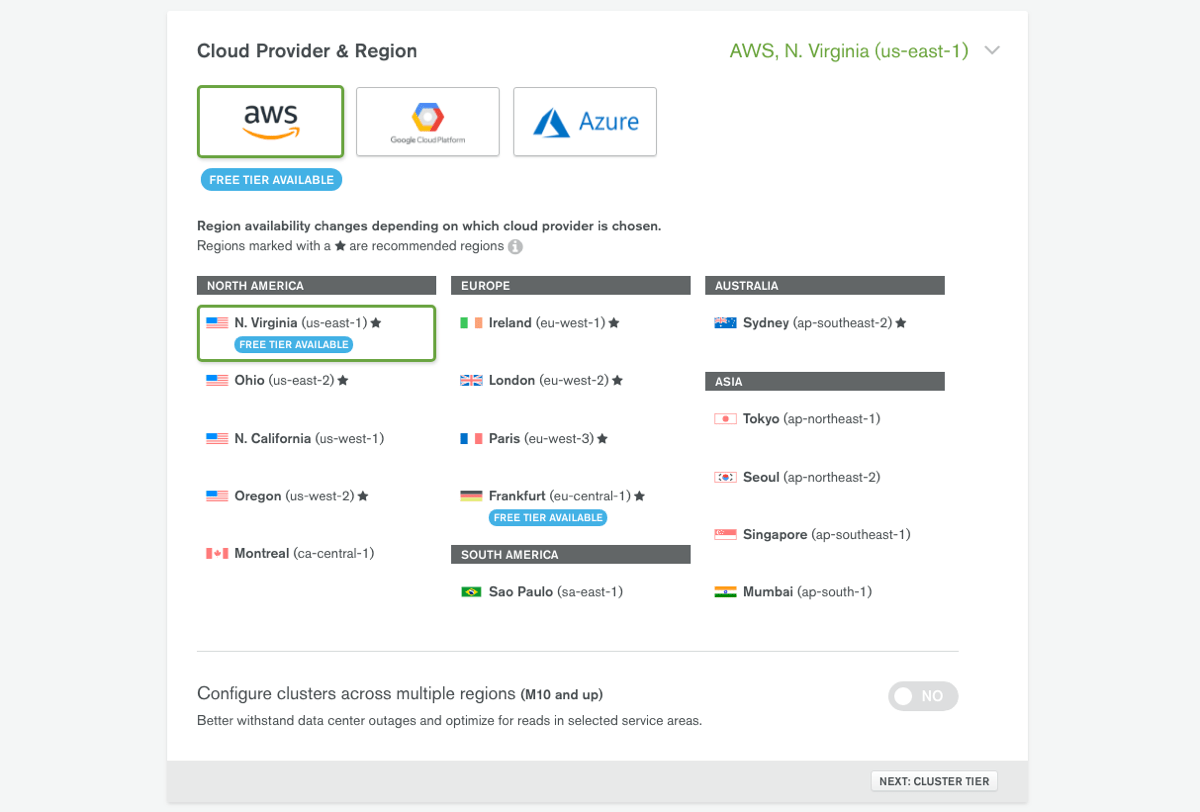
Choosing any of these cloud providers doesn’t mean that you also need an account for the cloud provider as well. This is just where your cluster will be hosted under MongoDB’s control.
After determining the cloud provider that you wish to use, the provider specifications need to be defined. I’ll be using AWS, but the steps should be more or less the same.
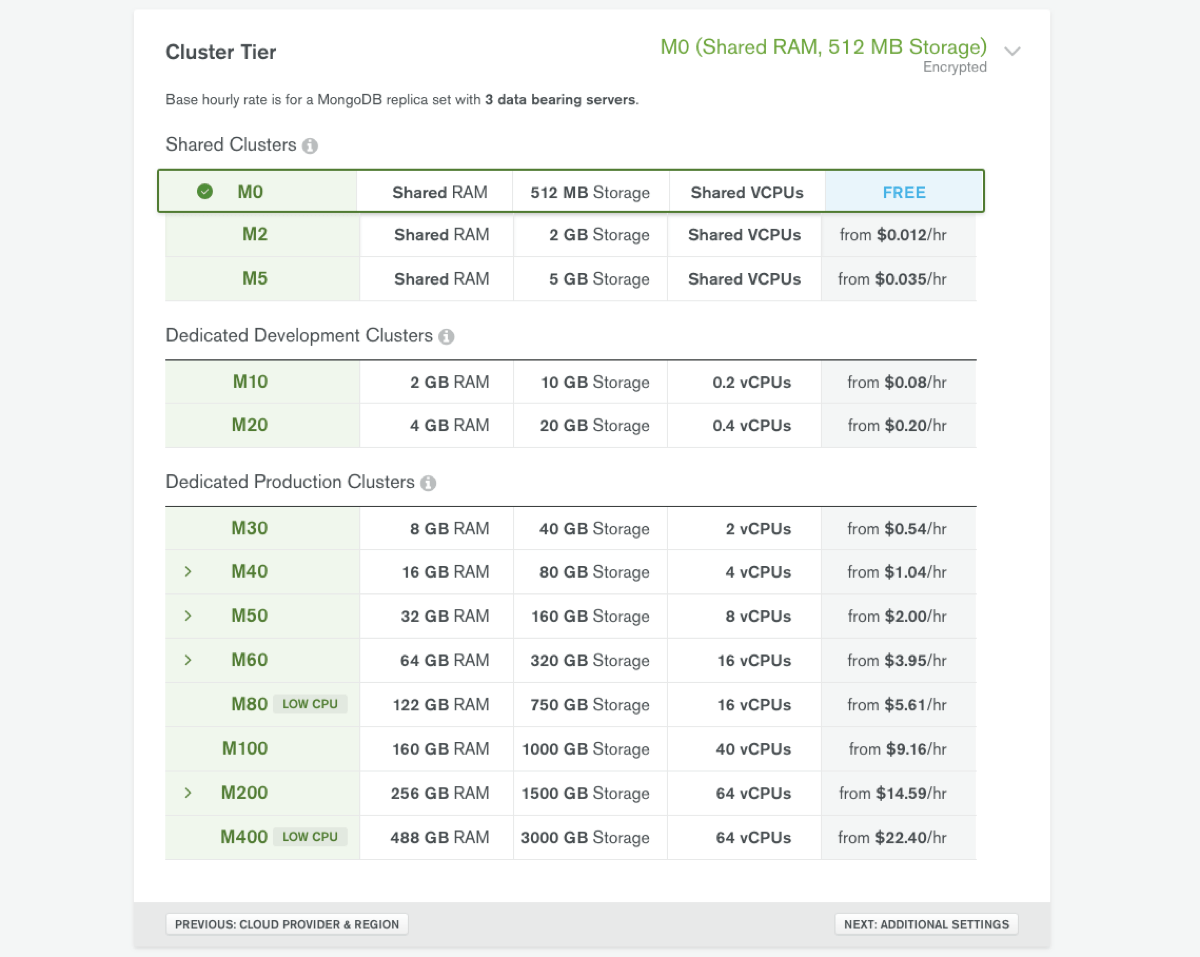
There is no wrong answer when it comes to defining the cluster specifications, however, it is important you choose depending on your own application needs.
After choosing your cluster specifications, you’ll be prompted to select any additional features that you want.
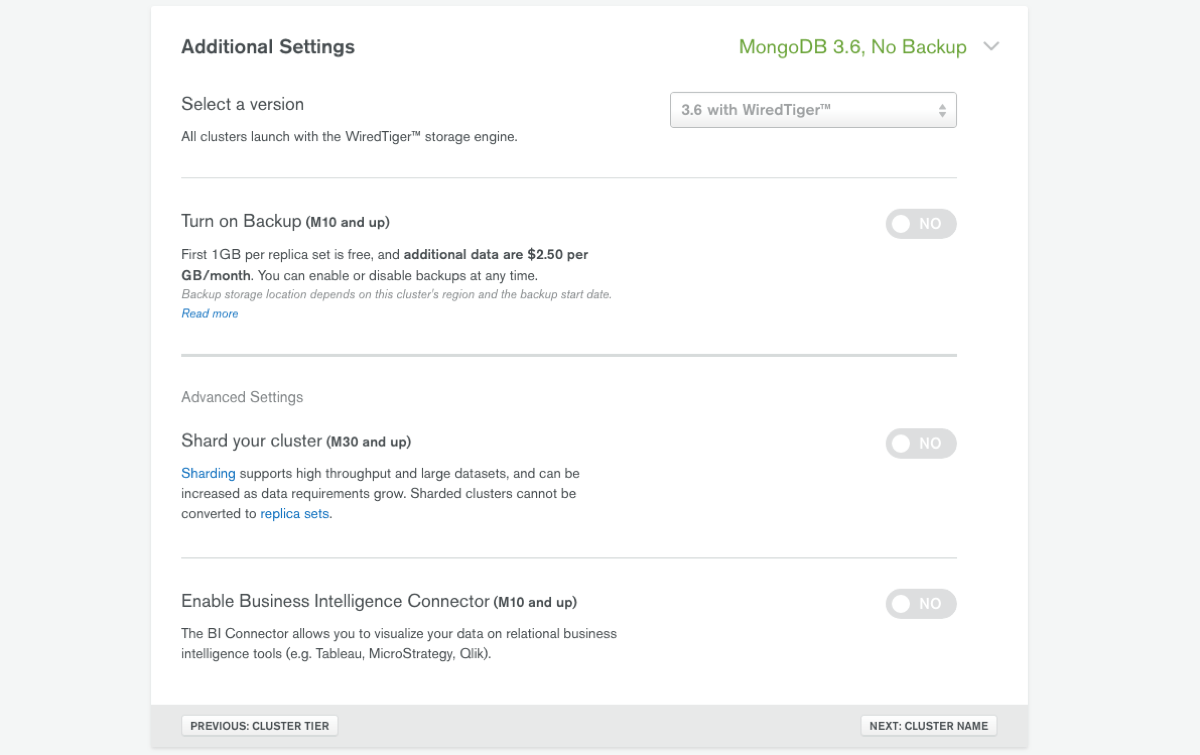
Additional features for your cluster include things like backups and data sharding. All the additional features are outside the scope of this particular tutorial, but depending on your organization and application needs, they may be necessities for you.
The final step in the deployment process includes giving your cluster a name.

If you have or plan to have multiple clusters or data centers, it might make sense to name your cluster something informative like “NYC-1” or “Finance”. I just threw out examples, but you can probably see where I’m going with things.
It may take a few minutes to create your cluster after saving. When creation is complete, we can proceed to defining our security rules.
Whitelist Remote Hosts and Define User Roles
For this tutorial, we know that we are going to be creating a web application. For this reason, we should have an application specific user and define the host of the application. Using a single user account for all applications or opening your cluster to all hosts is a great way to get yourself hacked. It is a good idea to follow security best practices for everything you build.
We’re going to start by creating a MongoDB user for our application. From the Clusters tab of your project, choose Security followed by MongoDB Users.

From this screen you’ll be able to see all your users as well as create new users. The users found here are not the same as Atlas users. Atlas users have access to your cloud dashboard while MongoDB users have access to your clusters.
When choosing Add New User you’ll be prompted to define the user privileges.
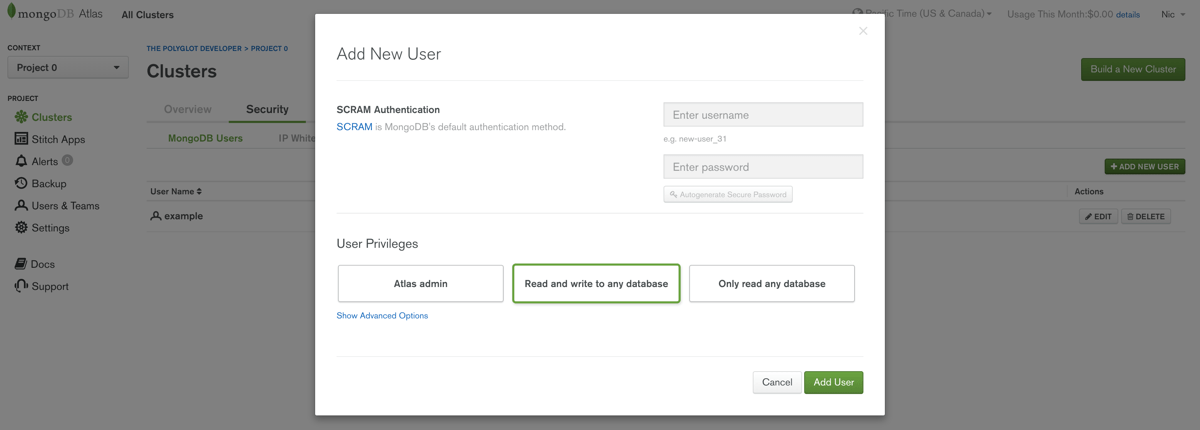
For our application, the user account must be able to read and write to a database. However, your future application needs might change, in which case create the correct user account privileges for the job.
With a user created, we need to whitelist our application host. From the Security tab of the Clusters menu, choose IP Whitelist.

From this screen you’ll be able to add view the current whitelist entries as well as add new entries. I strongly advise that you do not allow all remote connections. It can be a pain sometimes to setup a whitelist, but any trouble is worth the security of your application.
In our example, we’re going to be running our Node.js application locally on our computer. For this reason, we’re going to need to whitelist our home internet service provider (ISP). You can find your IP address from a website like WhatIsMyIp.org. In production, you’ll use your domain name or server IP address.
With your IP address in hand, choose Add IP Address.

Include your IP address and give it a comment so you know what it references. Probably the worst thing you can do when defining a whitelist is not keep track of what all the IP addresses reference.
At this point in time, our MongoDB database is ready to go and we can start development of our application.
Build an API with Node.js and Express Framework
For this tutorial, we’re going to be building a RESTful API with Node.js and Express Framework. Our example will be quite simple in the sense that we’ll be storing people data and querying for people data. This will all be done using the native MongoDB SDK and not an ODM like Mongoose. There is nothing against Mongoose, but it just isn’t necessary for this example.
Create a New Node.js Project with the Development Dependencies
Assuming that you’ve already installed Node.js on your computer, we can create a project from the command line by executing the following:
npm init -y
The above command will create a package.json file. All of our code will exist in a different file called app.js, so make sure you create it manually.
There aren’t many project dependencies for developing an API with MongoDB and Express. To download them, execute the following:
npm install express --save
npm install body-parser --save
npm install mongodb --save
The express package will be our framework and the body-parser package will allow us to handle request bodies with Express. Finally, the mongodb package is our database driver.
Before we get invested in the core application logic, let’s bootstrap the application code. Open the project’s app.js file and include the following:
const Express = require("express");
const BodyParser = require("body-parser");
const MongoClient = require("mongodb").MongoClient;
const ObjectId = require("mongodb").ObjectID;

var app = Express();

app.use(BodyParser.json());
app.use(BodyParser.urlencoded({ extended: true }));

app.listen(3000, () => {});
In the above code we’re importing our downloaded dependencies. When it comes to MongoDB, the MongoClient will allow us to establish a connection while the ObjectId will allow us to work with document ids. We’ll investigate that further in a future step.
Next we initialize Express Framework and configure the BodyParser package. Finally, we start listening on port 3000. At any time, we can test our application by executing the following:
node app.js
At this point we can attempt to establish a connection to our MongoDB cluster on Atlas.
Establish a Connection to MongoDB Atlas
Before we can establish a connection in our code to the MongoDB database, we need to know the connection string. This can be found in the Atlas dashboard by choosing Clusters, then the Overview tab followed by the Connect button.
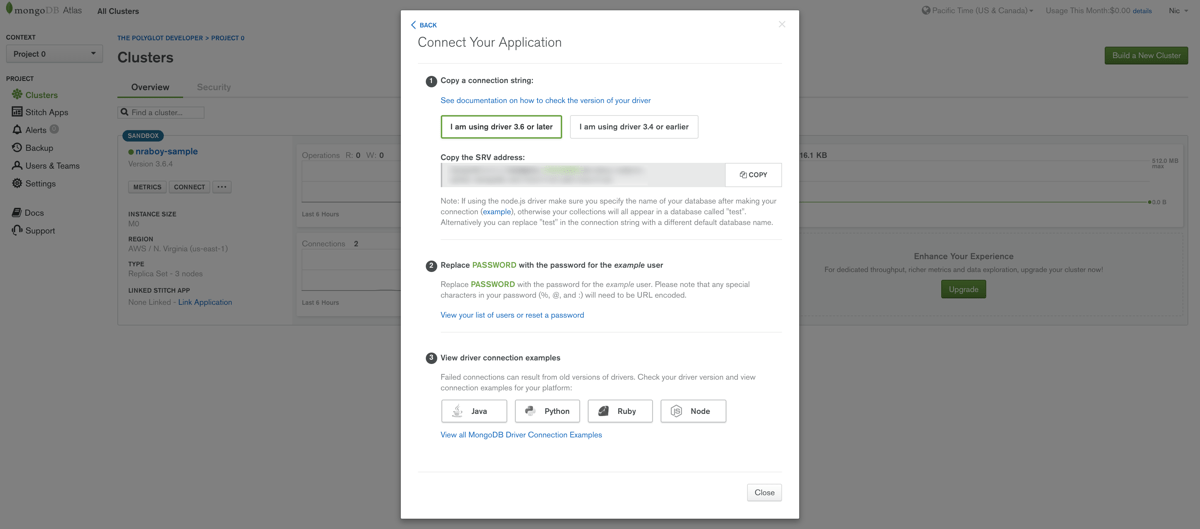
With the string in hand, we need to add it to our project’s app.js file. Within the app.js file, add the following:
const Express = require("express");
const BodyParser = require("body-parser");
const MongoClient = require("mongodb").MongoClient;
const ObjectId = require("mongodb").ObjectID;

const CONNECTION_URL = "mongodb+srv://<USERNAME>:<PASSWORD>@nraboy-sample-a22jr.mongodb.net/test?retryWrites=true";
const DATABASE_NAME = "example";

var app = Express();

app.use(BodyParser.json());
app.use(BodyParser.urlencoded({ extended: true }));

var database, collection;

app.listen(3000, () => {
    MongoClient.connect(CONNECTION_URL, { useNewUrlParser: true }, (error, client) => {
        if(error) {
            throw error;
        }
        database = client.db(DATABASE_NAME);
        collection = database.collection("people");
        console.log("Connected to `" + DATABASE_NAME + "`!");
    });
});
Notice that we’ve made a few changes here. For one, we’ve defined the connection string and a database that we wish to create and use. It is important you use your connection string, not mine and also use your own username and password.
When we start our application and it starts listening, we establish a connection and store the open database as well as a collection that we plan to use. These were globally defined variables so that they can be used in each of our endpoints.
Now that we’re connected to MongoDB, we can start designing our HTTP consumable API endpoints.
Design Endpoints for HTTP Consumption
For this tutorial we’re not going to create every possible endpoint for creating a great API. Instead, we’re going to focus on a few for creating and querying data.
As of now we have no data in the database, so let’s create some.
app.post("/person", (request, response) => {
    collection.insert(request.body, (error, result) => {
        if(error) {
            return response.status(500).send(error);
        }
        response.send(result.result);
    });
});
We aren’t doing any data validation, but when a client does a POST request to the /person endpoint, we take the body and insert it into our collection. Depending on the success or error response of the database, we return information back to the client.
With our application running, let’s assume someone issues a cURL request like the following:
curl -X POST \
    -H 'content-type:application/json' \
    -d '{"firstname":"Maria","lastname":"Raboy"}' \
    http://localhost:3000/person
If everything went smooth, we’ll have data in our database for the next step.
Within the app.js file, include the following endpoint code:
app.get("/people", (request, response) => {
    collection.find({}).toArray((error, result) => {
        if(error) {
            return response.status(500).send(error);
        }
        response.send(result);
    });
});
The goal here is to return all data in our collection representing people. We have no query conditions, hence the empty {} in the find command, and the results get converted into an array.
This endpoint can be tested by executing the following cURL statement from a command line:
curl -X GET http://localhost:3000/people
Alright, now let’s assume that we have a lot of people in our database and we only want to get a particular person. This is useful if you have a logged in user or are building some kind of master-detail application.
Take the following endpoint:
app.get("/person/:id", (request, response) => {
    collection.findOne({ "_id": new ObjectId(request.params.id) }, (error, result) => {
        if(error) {
            return response.status(500).send(error);
        }
        response.send(result);
    });
});
This time around we have a route parameter called id which will represent an object id in MongoDB. Using the findOne method, we can get a single record based on the criteria included in the object. The id isn’t a string which is why we have to use the ObjectId.
Depending on the actual data in our database, we can do a cURL command similar to this:
curl -X GET http://localhost:3000/person/5b103f48213e84103d52cfd5
It doesn’t matter how many endpoints you need, they will more or less be designed in the same fashion. However, in your production application you should probably have some data validation.
Conclusion
You just saw how to get started with developing a RESTful API using Node.js and MongoDB Atlas as the cloud NoSQL database. Atlas makes it easy to get started with MongoDB because it is a service in the cloud and doesn’t require any infrastructure configurations.
For more information on using Node.js with MongoDB, check out the developer documentation.

