Building a Real-Time AI Fraud Detection System with Spring Kafka and MongoDB
 April 21, 2025
 Tim Kelly
 Web Development


In this tutorial, we’ll build a real-time fraud detection system using MongoDB Atlas Vector Search, Apache Kafka, and AI-generated embeddings. We’ll demonstrate how MongoDB Atlas Vector Search can be used to detect anomalies in a stream of financial transactions by analyzing a user’s transaction history and identifying suspicious behavior based on LLM-generated embeddings.
Our solution will monitor MongoDB Change Streams using the Java synchronous driver, triggering vector searches on each new transaction to detect potential fraud. While this approach works well for our demo, and for many use cases, we’ll also discuss its limitations. Throughout the tutorial, I’ll cover alternative strategies to optimize performance, whether you need higher transaction throughput, faster fraud detection, or a more scalable architecture.
If you want to view the completed code for this tutorial, you can find it on GitHub.
What we are building
Our real-time fraud detection pipeline will work like this:
- Generate customer profiles: Create synthetic users with predictable spending habits and store them in MongoDB.
- Produce transactions: A Kafka producer generates transactions, computes AI embeddings, and sends them to Kafka.
- Consume transactions: A Kafka consumer reads transactions from Kafka and records them in MongoDB.
- Monitor in real-time: The application listens to MongoDB Change Streams to detect new transactions as they arrive.
- Run vector search: Each new transaction is compared against the user’s historical transactions using vector search.
- Detect fraud: A transaction is marked as fraud if:
- No similar transactions exist for that user.
- Any of the returned similar transactions are already flagged as fraud.
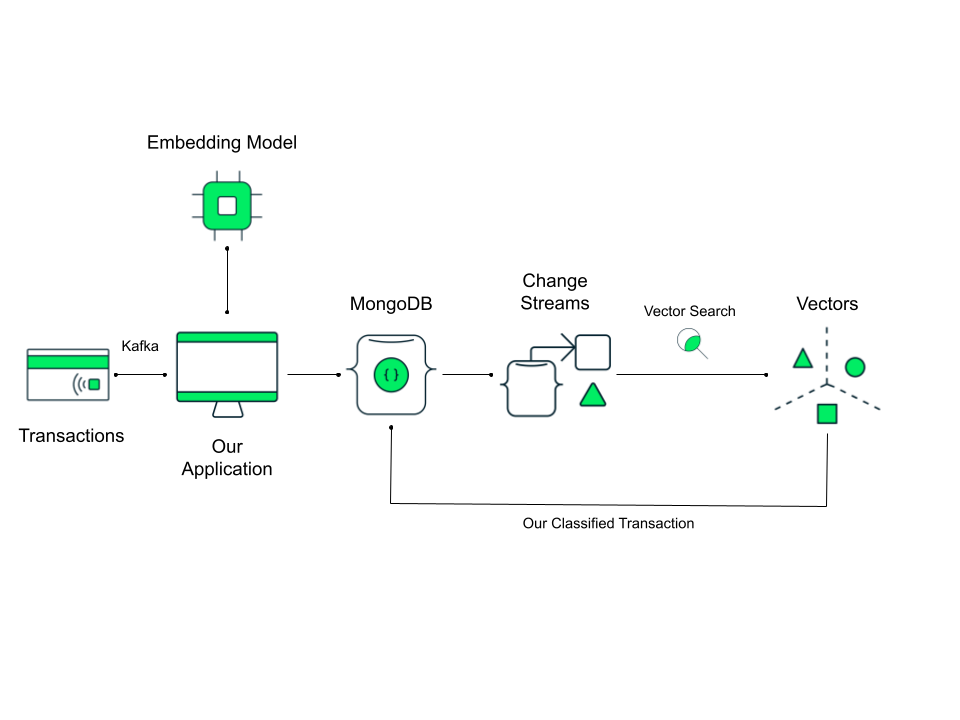
This pipeline ensures real-time anomaly detection using AI-powered embeddings and vector search.
Prerequisites
To follow along, you’ll need:
- A MongoDB Atlas account with a free-forever M0 (or higher) cluster set up.
- Kafka 3.5+ (local installation or Docker).
- Java 21 set up on your machine.
- OpenAI API key (for embeddings).
- Maven 3.9+.
Create our MongoDB database
Log into MongoDB Atlas and create a free-forever M0 cluster. Create a new database called fraud. In this database, we need to create two collections.
customerstransactions
For this simple demo, we are just going to create basic collections because, as of writing this, time series collections do not support search indexes. If you want to learn more about setting these up for your Java application, check out our tutorial Handle Time Series Data with MongoDB.
Create a Vector Search index
We are going to create a vector search index on our transactions collection. This will allow us to find semantically similar documents, to help us identify anomalies in our customer transactions, and mark these as fraud.
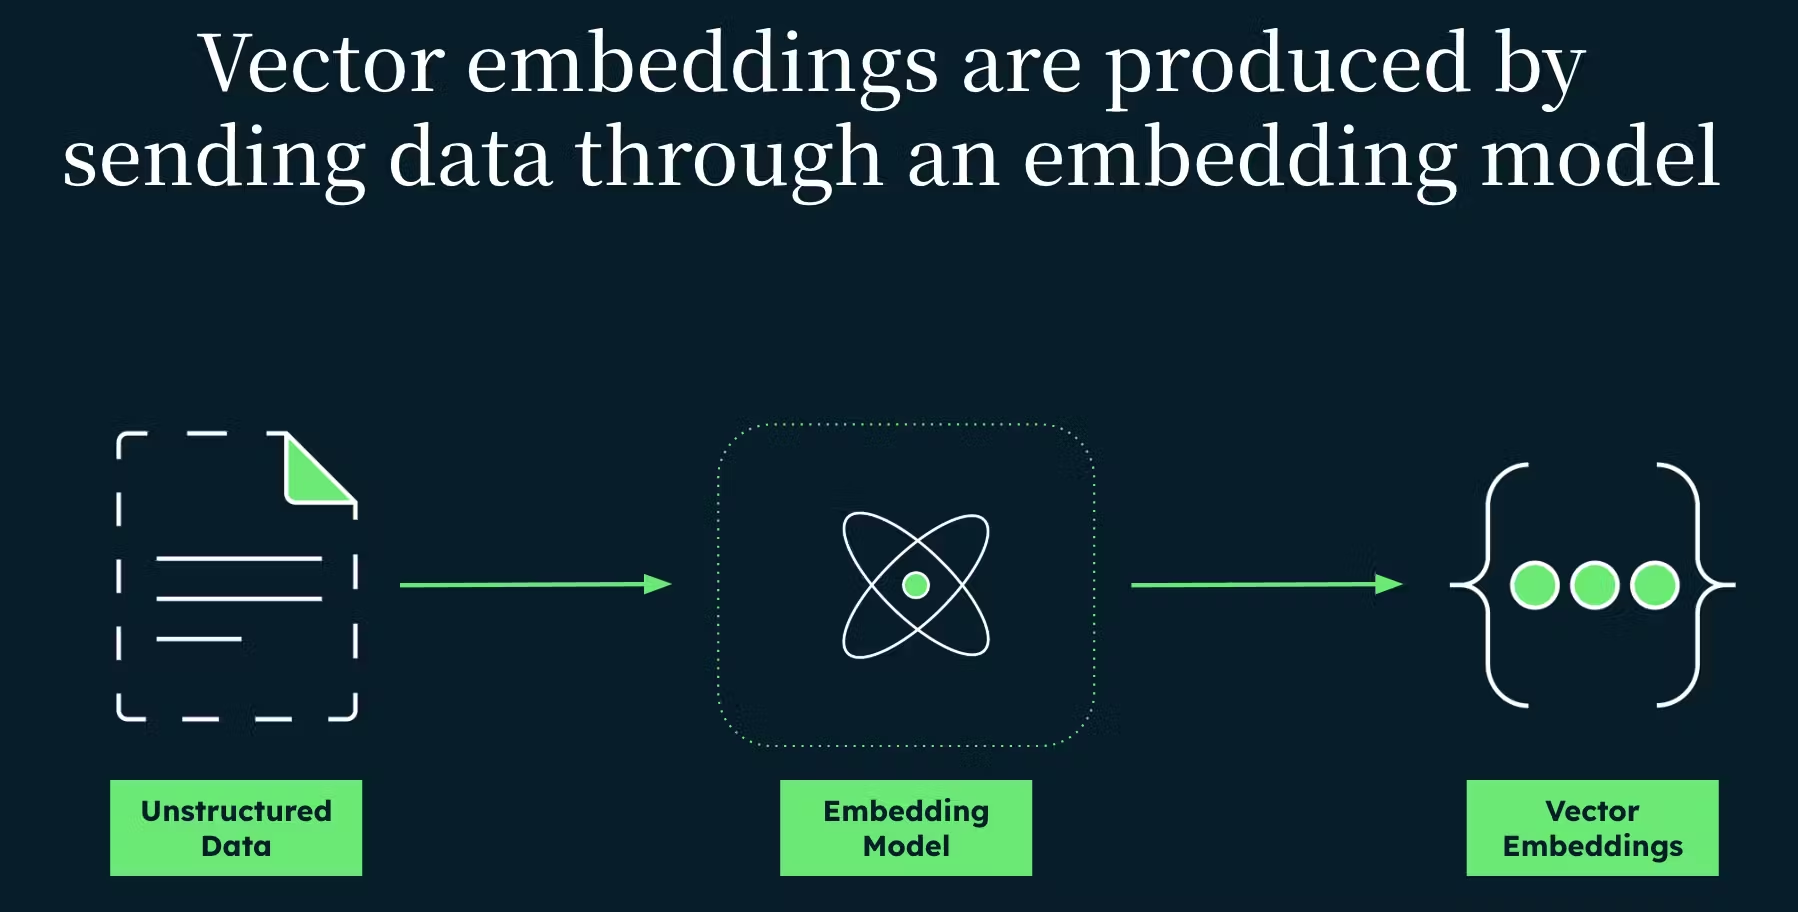
How does this work? Well, we create vector embeddings (numerical representations of our data) of our transactions, to store in our vector store, the transactions collection. We get these by sending the information from our transactions to an embedding model, like OpenAI’s text-embedding-3-small. These embeddings look like an array of floating point numbers, e.g., [2.0457, -3.1417895, …].
We then use MongoDB’s Atlas Vector Search, which uses a nearest neighbour algorithm to decide what transactions are semantically similar. These transactions are returned, and if the new transaction does not match any past transactions for that user, or if it matches transactions marked fraud, it could be an anomaly (potential fraud).
You can learn the in-depth steps to set up a Vector Search index in Atlas Vector Search Quick Start, but briefly:
Navigate to MongoDB Atlas → Collections → Click
transactions.Select → Atlas Search → Create Search Index + Vector Search.
Use the following JSON:
{
  "fields": [
    {
      "type": "vector",
      "path": "embedding",
      "numDimensions": 1536,
      "similarity": "dotProduct"
    }
  ]
}
Click
create index.
We are using 1536 for our number of dimensions because of the embedding model we will be using. OpenAI provides the text-embedding-3-small for embedding (among others). This is a general purpose model embedding text, but using a model tailored for financial fraud detection, especially a custom model tailored for and trained on your data, will lead to better results. Whether you’re looking for faster embeddings or more accurate predictions, you can gain some control of that here.
Since OpenAI embeddings are optimized for using the dot product algorithm, that is the similarity method we will stick with. It’s also worth noting that if fraudulent transactions tend to have stronger signals (e.g., very different merchants, categories, amounts), dot product helps capture that magnitude, along with the direction. Essentially, it naturally emphasises these stronger signals. In contrast, cosine similarity normalizes all vectors to unit length, effectively discarding this useful magnitude information. This means it would treat a small anomaly and a large one as equally “different” in direction, which can dilute the signal strength we care about when identifying fraud.
Create a Spring application
We are going to create our application using Spring Initializr. Here, we need to set our project to Maven, our language to Java, and our Spring Boot version to 3.4.2 (most recent stable release as of writing). We’ll also set our app name—mine is frauddetector—and for packaging, we are going to make a jar, and Java version 21.
We will need a couple of packages too.
- Spring Web
- Spring for Apache Kafka
- Spring Data MongoDB
- OpenAI
Download and unzip your Spring application. Open the application in the IDE of your choosing. Open the pom.xml file and add the necessary Jackson dependency.
<dependency>
    <groupId>com.fasterxml.jackson.core</groupId>
    <artifactId>jackson-databind</artifactId>
</dependency>
Setting up configuration
Now, open up the application and go to the application.properties. Here, we’ll add the various connection strings, tokens, and configuration settings for our dependencies.
MongoDB configuration
Spring Boot will automatically configure MongoDB, so we don’t have to manually create a MongoClient.
spring.application.name=frauddetector
spring.data.mongodb.uri=<YOUR_CONNECTION_STRING>
spring.data.mongodb.database=fraud
Just add your connection string and the database name and we’re ready to go.
Spring AI configuration
We use Spring AI with OpenAI’s API to generate text embeddings for transaction similarity detection. We will use these embeddings for vector search, allowing us to compare transactions based on their semantic meaning and patterns (overall vibe), rather than raw data.
spring.ai.openai.api-key=<YOUR_OPEN_AI_API_KEY>
spring.ai.openai.embedding.options.model=text-embedding-3-small
text-embedding-3-small is a lightweight embedding model optimized for low-latency vector generation. Alternatively, you could use "text-embedding-3-large" for higher accuracy but at increased cost and latency.
We will also create a Config package and add a MongoDBConfig class.
package com.mongodb.frauddetector.config;

import com.mongodb.client.MongoClient;
import com.mongodb.client.MongoCollection;
import com.mongodb.client.MongoDatabase;
import org.bson.Document;
import org.springframework.context.annotation.Bean;
import org.springframework.context.annotation.Configuration;

@Configuration
public class MongoDBConfig {

    private static final String DATABASE_NAME = "fraud";
    private static final String TRANSACTIONS_COLLECTION = "transactions";

    @Bean
    public MongoDatabase fraudDatabase(MongoClient mongoClient) {
        return mongoClient.getDatabase(DATABASE_NAME);
    }

    @Bean
    public MongoCollection<Document> transactionsCollection(MongoDatabase fraudDatabase) {
        return fraudDatabase.getCollection(TRANSACTIONS_COLLECTION);
    }
}
Here, we will add some methods to connect to our MongoDB database that we can reuse through our application.
Kafka configuration
Kafka is a distributed messaging system that allows producers to send messages and consumers to process them asynchronously. In our fraud detection system, we use Kafka to handle real-time transaction ingestion.
Spring Boot provides built-in Kafka support via spring-kafka, allowing us to configure Kafka producers and consumers using application properties.
spring.kafka.bootstrap-servers=localhost:9092
spring.kafka.producer.key-serializer=org.apache.kafka.common.serialization.StringSerializer
spring.kafka.producer.value-serializer=org.springframework.kafka.support.serializer.JsonSerializer
spring.kafka.consumer.bootstrap-servers=localhost:9092
spring.kafka.consumer.group-id=fraud-group
spring.kafka.consumer.auto-offset-reset=earliest
spring.kafka.consumer.key-deserializer=org.apache.kafka.common.serialization.StringDeserializer
spring.kafka.consumer.value-deserializer=org.springframework.kafka.support.serializer.JsonDeserializer
spring.kafka.consumer.properties.spring.json.trusted.packages=com.mongodb.frauddetector.model
If you are unfamiliar with Apache Kafka, this might look like a wall of gibberish, so let’s break down what each property does
Connecting to Kafka
spring.kafka.bootstrap-servers=localhost:9092- Specifies the Kafka broker address (default is
localhost:9092if running locally). - The producer and consumer will use this to send and receive messages.
- Specifies the Kafka broker address (default is
Kafka Producer configuration
spring.kafka.producer.key-serializer=org.apache.kafka.common.serialization.StringSerializer- Converts the message key (used for partitioning) into a string.
- We aren’t explicitly setting keys, so Kafka will auto-generate them.
spring.kafka.producer.value-serializer=org.springframework.kafka.support.serializer.JsonSerializer- Serializes Java objects (transactions) into JSON before sending them to Kafka.
- Required because we send complex objects like
Transaction.
Kafka Consumer configuration
spring.kafka.consumer.bootstrap-servers=localhost:9092- Specifies which Kafka broker the consumer should listen to.
spring.kafka.consumer.group-id=fraud-group- Defines a consumer group (
fraud-group). - Multiple consumers in this group can share the workload and balance message consumption.
- If a consumer fails, another instance in the group will resume from where it left off.
- Defines a consumer group (
spring.kafka.consumer.auto-offset-reset=earliest- Determines where to start consuming messages if no offset exists.
- Options:
earliest: Start from the beginning of the topic (useful for debugging).latest: Only read new messages (default behavior).
Kafka Consumer deserialization
spring.kafka.consumer.key-deserializer=org.apache.kafka.common.serialization.StringDeserializer- Deserializes message keys into Strings.
spring.kafka.consumer.value-deserializer=org.springframework.kafka.support.serializer.JsonDeserializer- Deserializes Kafka messages from JSON into Java objects.
- This is necessary since our transactions are sent as JSON.
spring.kafka.consumer.properties.spring.json.trusted-packages=com.mongodb.frauddetector.model- Ensures only trusted packages are deserialized.
- Prevents security vulnerabilities from untrusted deserialization.
How it all comes together:
- Kafka Producer sends transaction events as JSON to the “transactions” topic.
- Kafka Broker routes these events.
- Kafka Consumer reads these messages, deserializes them into
Transactionobjects, and stores them in MongoDB. - MongoDB Change Streams detect new transactions and trigger fraud detection.
Generate our synthetic customer profiles
To make our life simple, we’re going to start by adding a few enums. We’ll be using these when you’re generating our transactions, and defining what is “normal” behaviour for our sample customers. Create a package enums in the Spring app to store these.
First, we’ll create a Category enum.
package com.mongodb.frauddetector.enums;

public enum Category {
    RETAIL, TECH, GROCERY;
}
Next, a Currency enum.
package com.mongodb.frauddetector.enums;

public enum Currency {
    EUR, USD, GBP;
}
And finally, a slightly more exciting Merchant enum.
package com.mongodb.frauddetector.enums;

import java.util.List;
import java.util.Map;
import java.util.Random;

public enum Merchant {
    // Retail Merchants
    AMAZON, WALMART, BEST_BUY, TARGET, COSTCO, ETSY, EBAY, IKEA,

    // Tech Merchants
    APPLE, MICROSOFT, GOOGLE,

    // Grocery Merchants
    DUNNES_STORES, LIDL, TESCO;

    private static final Random RANDOM = new Random();

    private static final Map<Category, List<Merchant>> CATEGORY_MERCHANTS = Map.of(
            Category.RETAIL, List.of(AMAZON, WALMART, BEST_BUY, TARGET, COSTCO, ETSY, EBAY, IKEA),
            Category.TECH, List.of(APPLE, MICROSOFT, GOOGLE),
            Category.GROCERY, List.of(DUNNES_STORES, LIDL, TESCO)
    );

    public static Merchant getRandomMerchant(Category category) {
        List<Merchant> merchants = CATEGORY_MERCHANTS.get(category);
        return merchants.get(RANDOM.nextInt(merchants.size()));
    }
}
Here, we have a bit of logic to map our merchants to different categories, and a function to get a random merchant, to help with our transaction generation later (for testing and demo purposes).
The customer model
Our customer model is going to outline some information about our sample customers that will help us to define their spending habits. Since we’re building a fraud detection system, we need a way to recognize when a user makes a purchase that doesn’t align with their usual behavior. Create a model package and add a Customer class.
package com.mongodb.frauddetector.model;

import com.mongodb.frauddetector.enums.Category;
import com.mongodb.frauddetector.enums.Currency;
import com.mongodb.frauddetector.enums.Merchant;
import org.springframework.data.annotation.Id;
import org.springframework.data.mongodb.core.mapping.Document;

import java.util.List;
import java.util.Random;

@Document(collection = "customers")
public class Customer {
    @Id
    private String id;
    private final String userId;
    private final List<Merchant> merchants; // Trusted merchants
    private final List<Category> categories; // Trusted categories
    private final Double meanSpending;
    private final Double spendingStdDev;
    private final Currency preferredCurrency;

    public Customer(String userId, List<Merchant> merchants, List<Category> categories,
                    Double meanSpending, Double spendingStdDev, Currency preferredCurrency) {
        this.userId = userId;
        this.merchants = merchants;
        this.categories = categories;
        this.meanSpending = meanSpending;
        this.spendingStdDev = spendingStdDev;
        this.preferredCurrency = preferredCurrency;
    }

    public String getId() { return id; }
    public String getUserId() { return userId; }
    public List<Merchant> getMerchants() { return merchants; }
    public List<Category> getCategories() { return categories; }
    public Double getMeanSpending() { return meanSpending; }
    public Double getSpendingStdDev() { return spendingStdDev; }
    public Currency getPreferredCurrency() { return preferredCurrency; }

}
Each customer in our system has:
- A unique user ID: This lets us associate transactions with a specific person.
- Trusted merchants: The places they frequently shop.
- Trusted categories: The types of purchases they regularly make.
- Average spending habits: Their typical purchase amount and the standard deviation.
- Preferred currency: The currency they usually transact in.
This allows us to establish a baseline for their spending behavior. If a new transaction deviates too much, we can flag it as potentially fraudulent. We need to add a couple of helper functions to help us in our data generation. We’ll create the getFrequentCategory() method, to randomly select one of the user’s preferred categories. Open the Customer class and add the following method:
    public Category getFrequentCategory() {
        Random random = new Random();
        return categories.get(random.nextInt(categories.size()));
    }
We’ll also add the getUnfrequentCategory() method, to pick a category they don’t usually spend money on—which could be a red flag.
public Category getUnfrequentCategory() {
    // Get all categories from the enum
    List<Category> allCategories = List.of(Category.values());

    // Filter out frequent categories
    List<Category> infrequentCategories = allCategories.stream()
            .filter(category -> !categories.contains(category))
            .toList();

    // Pick a random category from the remaining ones
    Random random = new Random();
    return infrequentCategories.get(random.nextInt(infrequentCategories.size()));
}
If a user who only shops at grocery stores suddenly makes a high-ticket tech purchase, we might need to flag that as fraud.
Currency changes can be another strong indicator of fraud. If a user always transacts in USD, but suddenly makes a purchase in EUR, that could signal fraudulent activity.
public Currency getRandomSuspiciousCurrency() {
    // Get all categories from the enum
    List<Currency> allCurrency = List.of(Currency.values());

    // Filter out frequent categories
    List<Currency> infrequentCurrency = allCurrency.stream()
            .filter(currency -> !(preferredCurrency == currency))
            .toList();

    // Pick a random category from the remaining ones
    Random random = new Random();
    return infrequentCurrency.get(random.nextInt(infrequentCurrency.size()));
}
This method helps simulate a realistic fraud scenario, where someone might steal a card and use it overseas.
Customer seeding
Before we can generate transactions, we need some customers in our database. These aren’t just random users—we’re giving them specific spending habits, preferred merchants, and common transaction patterns. This will help us create realistic data for fraud detection. Create a service package and add a CustomerSeeder class. Copy the following code into it, then we’ll break down what is happening.
package com.mongodb.frauddetector.service;

import com.mongodb.frauddetector.enums.Category;
import com.mongodb.frauddetector.enums.Currency;
import com.mongodb.frauddetector.enums.Merchant;
import com.mongodb.frauddetector.model.Customer;
import jakarta.annotation.PostConstruct;
import org.slf4j.Logger;
import org.slf4j.LoggerFactory;
import org.springframework.data.mongodb.core.MongoTemplate;
import org.springframework.stereotype.Service;

import java.util.List;

@Service
public class CustomerSeeder {
    private static final Logger logger = LoggerFactory.getLogger(CustomerSeeder.class);
    private final MongoTemplate mongoTemplate;

    public CustomerSeeder(MongoTemplate mongoTemplate) {
        this.mongoTemplate = mongoTemplate;
    }

    @PostConstruct
    public void seedCustomers() {
        if (mongoTemplate.getCollection("customers").countDocuments() > 0) {
            logger.info("Customers already exist. Skipping seed.");
            return;
        }

        List<Customer> customers = List.of(
                new Customer("user_1", List.of(Merchant.AMAZON, Merchant.BEST_BUY), List.of(Category.TECH, Category.RETAIL), 150.0, 30.0, Currency.USD),
                new Customer("user_2", List.of(Merchant.WALMART, Merchant.TARGET, Merchant.DUNNES_STORES), List.of(Category.RETAIL, Category.GROCERY), 80.0, 20.0, Currency.USD),
                new Customer("user_3", List.of(Merchant.APPLE, Merchant.MICROSOFT), List.of(Category.TECH), 250.0, 50.0, Currency.EUR),
                new Customer("user_4", List.of(Merchant.ETSY, Merchant.BEST_BUY), List.of(Category.RETAIL), 100.0, 25.0, Currency.EUR),
                new Customer("user_5", List.of(Merchant.ETSY, Merchant.EBAY), List.of(Category.RETAIL), 90.0, 20.0, Currency.GBP),
                new Customer("user_6", List.of(Merchant.TESCO, Merchant.DUNNES_STORES), List.of(Category.GROCERY), 40.0, 10.0, Currency.EUR),
                new Customer("user_7", List.of(Merchant.LIDL, Merchant.COSTCO), List.of(Category.GROCERY), 35.0, 8.0, Currency.EUR),
                new Customer("user_8",  List.of(Merchant.GOOGLE, Merchant.MICROSOFT), List.of(Category.TECH), 15.0, 5.0, Currency.USD),
                new Customer("user_9", List.of(Merchant.EBAY, Merchant.ETSY), List.of(Category.RETAIL), 60.0, 15.0, Currency.GBP),
                new Customer("user_10", List.of(Merchant.COSTCO, Merchant.IKEA), List.of(Category.RETAIL), 25.0, 7.0, Currency.GBP)
        );

        mongoTemplate.insertAll(customers);
        logger.info("Customers seeded successfully!");
    }
}
Now, let’s walk through the implementation.
You might be wondering why we’re not using MongoRepository for this. While MongoRepository is great for simple CRUD operations, it doesn’t provide full control over how we seed our database.
Using MongoTemplate, we can directly check if data exists before inserting (so we don’t create duplicates).
We use Spring’s @PostConstruct annotation to run the seedCustomers() method automatically when the application starts. This ensures our database is populated before transactions start flowing.
@PostConstruct
public void seedCustomers() {
- If customer data already exists in the MongoDB collection, we skip seeding.
- Otherwise, we generate 10 customers, each with:
- A user ID.
- A list of trusted merchants.
- A list of frequent categories.
- A mean spending amount and standard deviation.
- A preferred currency.
Once the data is created, we use:
mongoTemplate.insertAll(customers);
Thanks to the magic of Spring and our @PostContruct annotation, mongoTemplate will bulk insert everything into our MongoDB database just by running the application.
How the sample customers are structured
Each customer is designed to behave predictably. For the sake of this demonstration, very predictably:
- Tech shoppers: Spend more on Amazon, Best Buy, and Apple.
- Grocery shoppers: Frequent Tesco, Dunnes Stores, or Lidl.
- General retail shoppers: Shop at Etsy, eBay, or Walmart.
- Spending amounts vary but follow a general pattern.
With this customer seeding in place:
- We have a structured dataset to test fraud detection.
- Customers behave in predictable ways, making anomalies easier to catch.
Once the customers are in MongoDB, we can move on to generating transactions.
The transaction model
The Transaction model represents individual financial transactions in our system. These transactions are generated based on our synthetic customer profiles and are stored in MongoDB. This model plays a key role in detecting anomalies by allowing us to compare each new transaction against a user’s historical behavior.
Create a Transaction class inside the model package:
package com.mongodb.frauddetector.model;

import com.fasterxml.jackson.annotation.JsonIgnoreProperties;
import com.fasterxml.jackson.annotation.JsonProperty;
import com.mongodb.frauddetector.enums.Category;
import com.mongodb.frauddetector.enums.Currency;
import com.mongodb.frauddetector.enums.Merchant;
import org.bson.BsonDocument;
import org.bson.codecs.configuration.CodecRegistry;
import org.bson.conversions.Bson;
import org.springframework.data.annotation.Id;
import org.springframework.data.mongodb.core.mapping.Document;
import java.time.Instant;
import java.util.Random;
import java.util.UUID;

import static com.mongodb.frauddetector.enums.Merchant.getRandomMerchant;

@JsonIgnoreProperties(ignoreUnknown = true)
@Document(collection = "transactions")
public class Transaction {
    @Id
    private String id;
    @JsonProperty("transaction_id")
    private String transactionId;
    private String userId;
    private double amount;
    private Currency currency;
    private Instant timestamp;
    private Merchant merchant;
    private Category category;
    private boolean isFraud;
    private float[] embedding = {};

    public Transaction() {}

    public String getId() {
        return id;
    }

    public void setId(String id) {
        this.id = id;
    }

    public String getTransactionId() {
        return transactionId;
    }

    public void setTransactionId(String transactionId) {
        this.transactionId = transactionId;
    }

    public String getUserId() {
        return userId;
    }

    public void setUserId(String userId) {
        this.userId = userId;
    }

    public double getAmount() {
        return amount;
    }

    public void setAmount(double amount) {
        this.amount = amount;
    }

    public Currency getCurrency() {
        return currency;
    }

    public void setCurrency(Currency currency) {
        this.currency = currency;
    }

    public Instant getTimestamp() {
        return timestamp;
    }

    public void setTimestamp(Instant timestamp) {
        this.timestamp = timestamp;
    }

    public Merchant getMerchant() {
        return merchant;
    }

    public void setMerchant(Merchant merchant) {
        this.merchant = merchant;
    }

    public Category getCategory() {
        return category;
    }

    public void setCategory(Category category) {
        this.category = category;
    }

    public boolean isFraud() {
        return isFraud;
    }

    public void setFraud(boolean fraud) {
        isFraud = fraud;
    }

    public float[] getEmbedding() {
        return embedding;
    }

    public void setEmbedding(float[] embedding) {
        this.embedding = embedding;
    }

}
Each transaction has:
- A unique transaction ID: Used to track and reference individual transactions.
- A user ID: Links the transaction to a specific customer.
- Amount: The total cost of the transaction.
- Currency: The currency in which the transaction was made.
- Timestamp: The exact time the transaction took place.
- Merchant: The vendor where the transaction occurred.
- Category: The type of purchase made.
- Fraud flag: A boolean value indicating whether the transaction is marked as fraudulent.
- Embedding: A numerical representation of the transaction generated via AI embeddings, which we’ll use for vector search.
At the top of our class, we specify which collection we want our financial transactions stored in, @Document(collection = "transactions"). Spring Data MongoDB handles the BSON serialization for us.
To detect fraudulent transactions, we’ll use vector search to compare transactions based on their overall context rather than exact matching. The generateEmbeddingText() method creates a string representation of the transaction, which we’ll later convert into an embedding.
public String generateEmbeddingText() {
    return userId + " " + amount + " " + currency + " " + merchant + " " + category;
}
Generating random transactions
We need to simulate realistic transaction data for our customers. The generateRandom() method creates our synthetic transactions that either align with or deviate from a user’s normal spending patterns.
public static Transaction generateRandom(Customer customer) {
    Random random = new Random();

    // Generate a normal or suspicious transaction
    boolean isSuspicious = random.nextDouble() < 0.1; // 10% chance of fraud

    double amount = isSuspicious ? customer.getMeanSpending() * (2 + random.nextDouble()) // Unusually large
            : customer.getMeanSpending() * (0.5 + random.nextDouble());

    Category category = isSuspicious ? customer.getUnfrequentCategory() : customer.getFrequentCategory();

    Merchant merchant = getRandomMerchant(category);

    Currency currency = isSuspicious ? customer.getRandomSuspiciousCurrency()
            : customer.getPreferredCurrency();

    return new Transaction(
            null,
            UUID.randomUUID().toString(),
            customer.getUserId(),
            amount,
            currency,
            Instant.now(),
            merchant,
            category,
            false
    );
}
This method randomly decides whether the transaction is suspicious (10% chance). Feel free to adjust this to suit your use case you want to test for. It then sets the amount to either a normal range or an unusually high value. Next, we choose a category and merchant based on the user’s normal spending behavior (or select a category they don’t usually shop in if the transaction is suspicious). Lastly, we select a currency, potentially choosing an unusual one for suspicious transactions.
This Transaction model is the backbone of our fraud detection pipeline. Once generated, transactions will be sent to Kafka, processed, and stored in MongoDB, where we’ll use MongoDB Change Streams and Vector Search to flag potential fraud.
How do we create our AI embeddings?
For this example, we are going to use the OpenAI API embedding model for no other reason than it’s simple. It is general purpose so it will work, and Spring AI makes it very straightforward to set up. Now, I highly recommend looking at a tailored embedding model for fraud detection for your application. If you want to learn how to do this, check out my tutorial on how to train your own fraud detection model in Java.
With our API key and embedding model configured in the application.properties from earlier, we need to create a config package, and add a new OpenAIConfig class.
Here, we just need to create a configuration class that takes in the API key, and sets up the OpenAI embedding model using Spring AI.
package com.mongodb.frauddetector.config;
import org.springframework.ai.embedding.EmbeddingModel;
import org.springframework.ai.openai.OpenAiEmbeddingModel;
import org.springframework.ai.openai.api.OpenAiApi;
import org.springframework.beans.factory.annotation.Value;
import org.springframework.context.annotation.Bean;
import org.springframework.context.annotation.Configuration;

@Configuration
public class OpenAIConfig {

    @Value("${spring.ai.openai.api-key}")
    private String apiKey;

    @Bean
    public EmbeddingModel embeddingModel() {
        return new OpenAiEmbeddingModel(new OpenAiApi(apiKey));
    }
}
Now, our embedding model is ready to be called upon for generating our vectors to store alongside our transactions in MongoDB.
With our embedding model set up, in our Service package, we can add our new class, EmbeddingGenerator.
package com.mongodb.frauddetector.service;

import org.springframework.ai.embedding.EmbeddingModel;
import org.springframework.stereotype.Component;

@Component
public class EmbeddingGenerator {
    private final EmbeddingModel embeddingModel;

    public EmbeddingGenerator(EmbeddingModel embeddingModel) {
        this.embeddingModel = embeddingModel;
    }

    public float[] getEmbedding(String transaction) {
        float[] embeddingResponse = this.embeddingModel.embed(transaction);
        return embeddingResponse;
    }
}
This will take the information we want to include in our embedding for each transaction, and generate this embedding using our embedding model.
The @Component notation allows Spring to detect our custom beans automatically. Basically, it lets us instantiate a class and inject any specified dependencies into it, and inject them wherever needed.
How to simply interact with our database with Spring Data MongoDB
For our simple CRUD operations for our customers and transactions, finds, and inserts mostly, we can use MongoRepository to get this done nice and simple. Create a package repository.
First, we’ll create a CustomerRepository interface.
package com.mongodb.frauddetector.repository;

import com.mongodb.frauddetector.model.Customer;
import org.springframework.data.mongodb.repository.MongoRepository;

public interface CustomerRepository extends MongoRepository<Customer, String> {
}
Next, we’ll create a TransactionRepository interface.
package com.mongodb.frauddetector.repository;

import com.mongodb.frauddetector.model.Transaction;
import org.springframework.data.mongodb.repository.MongoRepository;

public interface TransactionRepository extends MongoRepository<Transaction, String> {
}
We don’t need to do anything else. MongoRepository provides us with all the CRUD operations we need. We don’t need to create any custom query implementations. If you want to see more about what MongoRepository provides, and the differences between MongoRepository and MongoTemplate, check out our article about getting started with Spring Data MongoDB.
Seed the transactions for our customers
Now that we have customers in our database, we need to generate some transactions for them. These transactions will serve as our baseline data, allowing us to compare future transactions against historical spending patterns.
Create a TransactionSeeder class inside the service package and copy the following code.
package com.mongodb.frauddetector.service;

import com.mongodb.client.MongoCollection;
import com.mongodb.frauddetector.model.Customer;
import com.mongodb.frauddetector.model.Transaction;
import com.mongodb.frauddetector.repository.CustomerRepository;
import com.mongodb.frauddetector.repository.TransactionRepository;
import jakarta.annotation.PostConstruct;
import org.bson.Document;
import org.slf4j.Logger;
import org.slf4j.LoggerFactory;
import org.springframework.stereotype.Service;

import java.util.ArrayList;
import java.util.List;

@Service
public class TransactionSeeder {
    private static final Logger logger = LoggerFactory.getLogger(TransactionSeeder.class);
    private final CustomerRepository customerRepository;
    private final EmbeddingGenerator embeddingGenerator;
    private final TransactionRepository transactionRepository;
    private final TransactionChangeStreamListener transactionChangeStreamListener;
    private final MongoCollection<Document> transactionsCollection;

    public TransactionSeeder(CustomerRepository customerRepository,
                             EmbeddingGenerator embeddingGenerator, TransactionRepository transactionRepository,
                             TransactionChangeStreamListener transactionChangeStreamListener, MongoCollection<Document> transactionsCollection) {
        this.transactionsCollection = transactionsCollection;
        this.transactionRepository = transactionRepository;
        this.customerRepository = customerRepository;
        this.embeddingGenerator = embeddingGenerator;
        this.transactionChangeStreamListener = transactionChangeStreamListener;
    }

}
This service is responsible for generating sample transactions for each customer and creating the embeddings, then storing them in MongoDB.
It is also responsible for starting the Change Stream listener to detect real-time transactions after the database has been seeded. We make sure to do this after the database has been seeded. We are again accessing the MongoDB Java driver directly, to allow us to verify if the collection has already been seeded.
Next, we need a post construct method, seedTransactions().
@PostConstruct
public void seedTransactions() {
    if (transactionsCollection.countDocuments() > 0) {
        logger.info("Transactions already seeded.");
        return;
    }

    List<Customer> customers = customerRepository.findAll();
    List<Transaction> transactions = new ArrayList<>();

    for (Customer customer : customers) {
        for (int i = 0; i < 10; i++) {
            Transaction transaction = Transaction.generateRandom(customer);
            String embeddingText = transaction.generateEmbeddingText();
            float[] embedding = embeddingGenerator.getEmbedding(embeddingText);
            transaction.setEmbedding(embedding);
            transactions.add(transaction);
        }
    }

    transactionRepository.saveAll(transactions);
    logger.info("Seeded 100 transactions.");

    transactionChangeStreamListener.startListening();
    logger.info("Change Stream Listener Started.");
}
Once the service is initialized, the @PostConstruct method runs, ensuring that our transactions are created before the system starts processing new ones. We check if the transactions collection already contains data. If it does, we skip the seeding process. Otherwise, we generate 10 transactions per customer.
We fetch all customers from the database. Each customer gets a fixed amount of 10 historical transactions, and each transaction is randomly generated based on the customer’s typical spending habits.
Finally, we batch insert our transactions, and we start listening for real-time transactions so that new ones can be evaluated for fraud detection.
How we’ll send our transactions with a Kafka Producer
Now that we’ve seeded our customer data and generated initial transactions, we need a way to continuously produce transactions in real time. We’ll be using a Kafka Producer for this. The producer will generate synthetic transactions, compute their embeddings, and send them to Kafka for further processing.
Kafka follows a publish-subscribe model:
- Producers send messages to a Kafka topic (in this case,
"transactions"). - Consumers subscribe to that topic and process incoming messages.
- Topics store and distribute messages to consumers, ensuring scalability.
Create a TransactionProducer class inside the service package and copy the following code.
package com.mongodb.frauddetector.service;

import com.mongodb.frauddetector.model.Customer;
import com.mongodb.frauddetector.model.Transaction;
import com.mongodb.frauddetector.repository.CustomerRepository;
import jakarta.annotation.PostConstruct;
import org.slf4j.Logger;
import org.slf4j.LoggerFactory;
import org.springframework.kafka.core.KafkaTemplate;
import org.springframework.scheduling.annotation.Scheduled;
import org.springframework.stereotype.Service;
import java.util.List;
import java.util.Random;

@Service
public class TransactionProducer {
    private static final Logger logger = LoggerFactory.getLogger(TransactionProducer.class);

    private static final String TOPIC = "transactions";
    private final EmbeddingGenerator embeddingGenerator;
    private final KafkaTemplate<String, Transaction> kafkaTemplate;
    private List<Customer> customers;
    private final Random random = new Random();
    private final CustomerRepository customerRepository;

    public TransactionProducer(KafkaTemplate<String, Transaction> kafkaTemplate, EmbeddingGenerator embeddingGenerator, CustomerRepository customerRepository) {
        this.kafkaTemplate = kafkaTemplate;
        this.embeddingGenerator = embeddingGenerator;
        this.customerRepository = customerRepository;
    }
}
Spring’s Kafka template is used to send messages to a Kafka topic. Next, we need a method to fetch customer data to create transactions. Create a @PostConstruct method.
@PostConstruct
public void loadCustomers() {
    customers = customerRepository.findAll();
    if (customers.isEmpty()) {
        logger.error("Warning: No customers found! Transactions may fail.");
    } else {
        logger.info("Cached {} customers for transaction generation.", customers.size());
    }
}
We cache customer data in memory when the application starts. This avoids repeated database lookups and speeds up transaction generation. Now, we need a method to generate our synthetic transactions. We will use the @Scheduled annotation to create a generateAndSendTransaction() method to run every 100ms.
@Scheduled(fixedRate = 100)
public void generateAndSendTransaction() {
    if (customers == null || customers.isEmpty()) {
        logger.error("No customers available. Skipping transaction generation.");
        return;
    }
    Transaction transaction = Transaction.generateRandom(customers.get(random.nextInt(customers.size())));
    String embeddingText = transaction.generateEmbeddingText();
    transaction.setEmbedding(embeddingGenerator.getEmbedding(embeddingText));
    kafkaTemplate.send(TOPIC, transaction.getTransactionId(), transaction);
    logger.info("Transaction sent to topic {}", TOPIC);
}
This randomly selects a customer, creates a transaction, and generates an embedding. It then sends the transaction to Kafka.
We also need to add @EnableScheduling to our FrauddetectorApplication class to allow us to schedule these transactions for our demo.
package com.mongodb.frauddetector;

import org.springframework.boot.SpringApplication;
import org.springframework.boot.autoconfigure.SpringBootApplication;
import org.springframework.scheduling.annotation.EnableScheduling;

@SpringBootApplication
@EnableScheduling
public class FrauddetectorApplication {

    public static void main(String[] args) {
       SpringApplication.run(FrauddetectorApplication.class, args);
    }

}
Now that our Kafka Producer is generating transactions and sending them to a Kafka topic, we need a way to consume them and store them in MongoDB. This is where the Kafka Consumer comes in.
Ingest our transactions
This step is fairly simple using spring-kafka. In the service package, add a TransactionConsumer class. We’ll set up a simple Kafka listener to automatically process incoming transaction messages.
package com.mongodb.frauddetector.service;

import com.mongodb.frauddetector.model.Transaction;
import com.mongodb.frauddetector.repository.TransactionRepository;
import org.springframework.kafka.annotation.KafkaListener;
import org.springframework.stereotype.Service;

@Service
public class TransactionConsumer {

    private final TransactionRepository transactionRepository;

    public TransactionConsumer(TransactionRepository transactionRepository) {
        this.transactionRepository = transactionRepository;
    }

    @KafkaListener(topics = "transactions", groupId = "fraud-group")
    public void consumeTransaction(Transaction transaction) {
        transactionRepository.save(transaction);
    }
}
How Kafka Consumers work
Kafka follows a publish-subscribe model:
- Producers publish messages to a topic (in this case,
"transactions"). - Consumers subscribe to that topic and process incoming messages.
- Consumers can be grouped into consumer groups, where each instance reads a portion of the messages.
For our system:
- Our Kafka Producer generates transactions and publishes them to Kafka.
- Our Kafka Consumer listens to the
"transactions"topic. - Each transaction is stored in MongoDB via
TransactionRepository.
With our transactions being produced and consumed, we can now look at how we will monitor incoming transactions on our MongoDB database.
Monitor our database with Change Streams
Once transactions are stored in MongoDB, we need a way to detect new transactions in real time and trigger fraud detection immediately. Instead of repeatedly querying the database for new data, we can use MongoDB Change Streams to efficiently listen for changes.
What is a change stream?
MongoDB Change Streams provide a real-time feed that allows applications to listen for inserts, updates, deletes, and replacements happening in a collection or database. It works similarly to an event listener, triggering an action whenever a change occurs.
Instead of running queries to check for new transactions, Change Streams push updates to our application as soon as they occur, making fraud detection more efficient and reducing unnecessary database calls.
So why use Change Streams?
- Real-time monitoring: Detects fraud immediately after a transaction is inserted.
- Push-based updates: Eliminates the need for polling or manual querying.
- Optimized performance: Runs efficiently, even for high-velocity transaction data.
- Built-in scalability: Works across sharded clusters and replica sets.
To monitor transactions, we create a TransactionChangeStreamListener service in our service package.
package com.mongodb.frauddetector.service;

import com.mongodb.client.*;
import com.mongodb.client.model.Aggregates;
import com.mongodb.client.model.Filters;
import com.mongodb.client.model.changestream.ChangeStreamDocument;
import org.bson.Document;
import org.bson.conversions.Bson;
import org.slf4j.Logger;
import org.slf4j.LoggerFactory;
import org.springframework.stereotype.Service;

import java.util.List;
import java.util.concurrent.Executors;
import java.util.concurrent.ExecutorService;

@Service
public class TransactionChangeStreamListener {
    private static final Logger logger = LoggerFactory.getLogger(TransactionChangeStreamListener.class);

   private final TransactionVectorSearchService vectorSearchService;
    private final ExecutorService executorService = Executors.newSingleThreadExecutor(); // Keeps it synchronous
    private final MongoCollection<Document> transactionsCollection;

    public TransactionChangeStreamListener(TransactionVectorSearchService vectorSearchService, MongoCollection<Document> transactionsCollection) {
        this.transactionsCollection = transactionsCollection;
        this.vectorSearchService = vectorSearchService;
    }
}
We need to create a method startListening() to begin monitoring our database.
public void startListening() {
    executorService.submit(() -> {
        // Filter to only listen for INSERT operations
        List<Bson> pipeline = List.of(Aggregates.match(Filters.eq("operationType", "insert")));

        try (MongoCursor<ChangeStreamDocument<Document>> cursor = transactionsCollection.watch(pipeline).iterator()) {
            while (cursor.hasNext()) {
                ChangeStreamDocument<Document> change = cursor.next();
                Document transactionDoc = change.getFullDocument();

                if (transactionDoc != null) {
                    logger.info("New transaction detected: {}", transactionDoc.getString("transactionId"));

                    List<Double> embedding = transactionDoc.getList("embedding", Double.class);
                    if (embedding != null) {
                        logger.info("Performing vector search");
                        vectorSearchService.evaluateTransactionFraud(transactionDoc);
                    } else {
                        logger.error("Warning: Transaction does not contain an embedding field.");
                    }
                }
            }
        }
    });
}
Now, the change stream monitors all operations on our collection. We don’t care about the updates or deletes for our use case, so we use the aggregation pipeline to filter for only inserts.
List<Bson> pipeline = List.of(Aggregates.match(Filters.eq("operationType", "insert")));
With each incoming transaction, we extract the embedding and use it to run a vector search (we are going to implement this next). If this returns similar transactions marked fraud, we are going to mark this new transaction as fraud. If we don’t find any similar transactions for that customer, we are also going to mark it as fraud. We will go more into the implementation of this logic in the next section.
Fraud detection with vector search
Fraud detection in this system relies on MongoDB Atlas Vector Search, which allows us to compare transaction embeddings against historical transactions to determine if a new transaction is suspicious. Create a class TransactionVectorSearchService in the service package.
package com.mongodb.frauddetector.service;

import com.mongodb.client.MongoCollection;
import com.mongodb.client.model.Aggregates;
import com.mongodb.client.model.Filters;
import com.mongodb.client.model.Updates;
import com.mongodb.client.model.search.VectorSearchOptions;
import org.bson.Document;
import org.bson.conversions.Bson;
import org.slf4j.Logger;
import org.slf4j.LoggerFactory;
import org.springframework.stereotype.Service;

import java.util.ArrayList;
import java.util.List;
import java.util.Arrays;

import static com.mongodb.client.model.search.SearchPath.fieldPath;

@Service
public class TransactionVectorSearchService {
    private static final Logger logger = LoggerFactory.getLogger(TransactionVectorSearchService.class);

    private final MongoCollection<Document> transactionCollection;
    private static final String VECTOR_INDEX_NAME = "vector_index"; // Ensure this matches your Atlas index name
    private static final int SEARCH_LIMIT = 5; // Number of similar transactions to retrieve
    private static final int NUM_CANDIDATES = 50; // Number of approximate neighbors to consider

   public TransactionVectorSearchService(MongoCollection<Document> transactionCollection) {
        this.transactionCollection = transactionCollection;
    }
}
The TransactionVectorSearchService is responsible for:
- Running vector search on each new transaction.
- Retrieving similar transactions from the database.
- Determining fraud likelihood based on similarity.
Now, this first method we will create is the method we are calling in our Change Stream listener. Create the evaluateTransactionFraud() method that will take in our transaction document as a parameter.
public void evaluateTransactionFraud(Document transactionDoc) {
    String transactionId = transactionDoc.getString("transactionId");
    String userId = transactionDoc.getString("userId");
    List<Double> embedding = transactionDoc.getList("embedding", Double.class);

    // Run vector search to find similar transactions
    List<Document> similarTransactions = findSimilarTransactions(embedding, userId);

    // If no similar transactions exist for this user OR any of them are fraud -> Mark as fraud
    boolean isFraud = similarTransactions.isEmpty() ||
            similarTransactions.stream().anyMatch(doc -> doc.getBoolean("isFraud", false));

    if (isFraud) {
        markTransactionAsFraud(transactionId);
    }
}
First, we’re going to extract our transactionId, our UserId, and our Embedding. Next, we’ll call a helper function findSimilarTransactions(), and pass in our embeddings and the user.
List<Document> findSimilarTransactions(List<Double> embedding, String userId) {
    Bson vectorSearch = Aggregates.vectorSearch(
            fieldPath("embedding"),
            embedding,
            VECTOR_INDEX_NAME,
            SEARCH_LIMIT,
            VectorSearchOptions.approximateVectorSearchOptions(NUM_CANDIDATES)
    );

    Bson matchUser = Aggregates.match(Filters.eq("userId", userId));

    return transactionCollection.aggregate(Arrays.asList(vectorSearch, matchUser))
            .into(new ArrayList<>());
}
In findSimilarTransactions(), we create an aggregation pipeline. Here, we set up our vector search to return the top five similar transactions, and filter by the user. We return this to our evaluateTransactionFraud() method, where we run some fraud detection logic.
boolean isFraud = similarTransactions.isEmpty() ||
        similarTransactions.stream().anyMatch(doc -> doc.getBoolean("isFraud", false));
This will return isFraud = True if we can’t find any similar transactions for that user, or if any of the returned transactions are marked as fraud. If this is the case, we call the method, markTransactionAsFraud(), and pass in the transactionId.
private void markTransactionAsFraud(String transactionId) {
    transactionCollection.updateOne(
            Filters.eq("transactionId", transactionId),
            Updates.set("isFraud", true)
    );
    logger.info("Transaction marked as fraud: {}", transactionId);
}
This will update the document in our MongoDB collection.
Now, this logic works perfectly fine for my simple little demo, but will it work for you? Maybe fraudulent transactions look remarkably similar across all your customers. In this case, it would be advisable to not filter by user. Maybe a larger number of transactions need to be passed back to get a more thorough look at your users’ spending history. It might also make sense to maintain a list of likely fraudulent vendors to automatically flag. In the next section, we go through some of the limitations of this implementation and discuss how you may tailor it to your use case.
Limitations of our application
While vector search is a powerful tool for detecting fraudulent transactions, there are a few notable limitations:
- MongoDB Atlas Vector Search does not support batching multiple queries. This means each transaction must be evaluated individually, which can lead to performance bottlenecks in high-throughput environments.
- Since each transaction must be queried separately, this approach may become slow when processing hundreds upon thousands of transactions per second.
Atlas Triggers for monitoring incoming transactions
To reduce latency and avoid excessive document transfers between the application and MongoDB, leverage MongoDB Atlas Triggers. Instead of running vector search from the application, we can move that logic directly into MongoDB using an Atlas trigger.
- Benefits
- Reduces latency. Since the vector search runs within MongoDB, we avoid the overhead of sending documents back and forth between the database and the application.
- Offloads processing to MongoDB. This means the application doesn’t need to handle the change stream, freeing up resources for other tasks.
- Ensures real-time fraud detection. As soon as a transaction is stored, it is immediately analyzed for fraud inside MongoDB.
- Limitations
- Atlas Triggers have a hard timeout of 30 seconds, which may be problematic for high volumes of transactions or complex fraud detection logic.
- Less flexible than application-side logic. If we need customized fraud detection workflows, it may be harder to modify compared to handling it in our application.
- The trigger will still need to run a vector search for each transaction, which means batching remains a challenge.
- Implementation
- MongoDB Atlas supports triggers that can execute logic when new documents are inserted into a collection.
- Instead of listening for changes in the application, we can set up a trigger on the transactions collection.
- When a new transaction is inserted, the trigger can run a vector search within MongoDB and flag the transaction as fraud if necessary.
| Use Case | Best Approach |
|---|---|
| Low-latency fraud detection | MongoDB Trigger |
| Need for flexible fraud detection rules | Application Logic |
| High transaction volume (thousands/sec) | Triggers (30s limit)—consider batching in-memory |
| Want to avoid excessive application queries | MongoDB Trigger |
Other possible solutions
Maintain a cache
- Store recent transactions in-memory and check against them before running vector search.
- Benefits:
- Reduces database query load by leveraging local memory.
- Speeds up fraud detection by avoiding unnecessary queries.
- Implementation:
- Store the last N transactions per user.
- Check if the embedding is already in the cache before querying MongoDB.
Run local similarity search
- Use a local similarity search algorithm (e.g., cosine similarity) before querying MongoDB Vector Search.
- Benefits:
- Filters out transactions less likely to be fraud, reducing unnecessary vector searches.
- Implementation:
- Store recent fraud transaction embeddings in-memory.
- Run a cosine similarity check locally.
- Only high-similarity transactions go to MongoDB Vector Search.
Use a fraud likelihood score
- Assign a fraud likelihood score based on transaction metadata (e.g., unusual amount, category, merchant).
- Benefits:
- Prioritizes high-risk transactions for vector search.
- Reduces unnecessary vector searches for low-risk transactions.
- Implementation:
- Define rules for suspicious transactions (e.g., transaction amount is 10x higher than normal).
- Transactions with a high fraud score are sent to MongoDB Vector Search.
- Others skip vector search and are stored directly.
When it comes to your application, it is likely going to be a hybrid approach. Each application will have its own considerations, needs, and limitations. In any case, a hybrid approach could work—using triggers to flag transactions and the application for deeper fraud analysis.
Run our application
So with our fraud detection pipeline set up, it’s time to run our application. First, we need to start our Kafka.
Starting Apache Kafka
Before starting Kafka for the first time, we need to format its metadata log directory. This only needs to be done once.
export KAFKA_CLUSTER_ID="$(bin/kafka-storage.sh random-uuid)"
bin/kafka-storage.sh format --standalone -t $KAFKA_CLUSTER_ID -c config/server.properties
This initializes the internal metadata quorum and sets up Kafka’s KRaft storage directory. Now, we start the Kafka broker, using our config.
bin/kafka-server-start.sh config/server.properties
The broker handles all messaging: storing, forwarding, and distributing messages between producers and consumers. Since we’re running Kafka in standalone mode, this single broker is responsible for everything. If everything starts successfully, you should see Kafka logs indicating that the broker is up and running.
Lastly, we need to open up a terminal and create our transactions topic.
bin/kafka-topics.sh --create \
  --topic transactions \
  --bootstrap-server localhost:9092 \
  --partitions 1 \
  --replication-factor 1
This command creates a topic named transactions. It uses one partition for simplicity, but in production, you would likely want more for scalability. It also sets the replication factor to 1, since we’re running only a single broker.
Run our Spring app
Now that we have our Kafka up and running, time to run our app.
mvn clean spring-boot:run
There will be some start-up time, about 100 seconds, to generate the sample data and populate the database. If everything is working, you should see logs indicating:
- Customers have been seeded.
- Transactions are being generated and sent to Kafka.
- Kafka Consumer is saving transactions in MongoDB.
- Change Stream is monitoring new transactions.
- Vector Search is detecting fraud in real-time.
hangeStreamListener  : Performing vector search
2025-02-24T15:29:56.479Z  INFO 81047 --- [frauddetector] [   scheduling-1] c.m.f.service.TransactionProducer        : Transaction sent to topic transactions
2025-02-24T15:29:56.520Z  INFO 81047 --- [frauddetector] [pool-2-thread-1] c.m.f.s.TransactionChangeStreamListener  : New transaction detected: 3ddc2181-5bb3-42b8-8b7b-953aaf098429
2025-02-24T15:29:56.520Z  INFO 81047 --- [frauddetector] [pool-2-thread-1] c.m.f.s.TransactionChangeStreamListener  : Performing vector search
2025-02-24T15:29:56.628Z  INFO 81047 --- [frauddetector] [pool-2-thread-1] c.m.f.s.TransactionVectorSearchService   : Transaction marked as fraud: 3ddc2181-5bb3-42b8-8b7b-953aaf098429
2025-02-24T15:29:56.839Z  INFO 81047 --- [frauddetector] [   scheduling-1] c.m.f.service.TransactionProducer        : Transaction sent to topic transactions
2025-02-24T15:29:56.881Z  INFO 81047 --- [frauddetector] [pool-2-thread-1] c.m.f.s.TransactionChangeStreamListener  : New transaction detected: 7354568d-7a39-4708-904b-b14c913ce2d0
2025-02-24T15:29:56.881Z  INFO 81047 --- [frauddetector] [pool-2-thread-1] c.m.f.s.TransactionChangeStreamListener  : Performing vector search
2025-02-24T15:29:57.050Z  INFO 81047 --- [frauddetector] [   scheduling-1] c.m.f.service.TransactionProducer        : Transaction sent to topic transactions
Conclusion
So, we now have a Spring app that can stream in financial transactions from Apache Kafka, and upon insertion into the database, can use Atlas Vector Search to indicate whether they appear to be fraudulent.
If you found this tutorial useful, check out more about what you can do with MongoDB in Java, such as building invincible applications with Temporal and MongoDB.
This content first appeared on DEV.

Tim Kelly
Developer Advocate at MongoDB and Java Expert.
Follow Us

Support This Site
If you found this developer resource helpful, please consider supporting it through the following options:


