Object Pooling Sprites in a Phaser Game for Performance Gains
 September 23, 2020
 Nic Raboy
 Game Development


Performance is everything when it comes to video games. Lag and stutter due to dropped frames can easily ruin your game. This means that you have to be considerate of how you manage your game resources to prevent unnecessary operations and stress on the client computer or mobile devices running the game.
If you’ve got a game with a lot of items, enemies, etc., creating and destroying these sprites as necessary is an expensive task. Instead, it makes sense to create an object pool with a predefined number of preloaded sprites that are used or hidden as necessary. This means that instead of creating a sprite when you need it, you pull the sprite from the pool. When you’re done with the sprite, instead of destroying it, you add it back to the pool. While this seems like a silly task, it can have huge performance gains within your game.
In this tutorial, we’re going to see how to create and use an object pool for our sprites in a Phaser 3.x game.
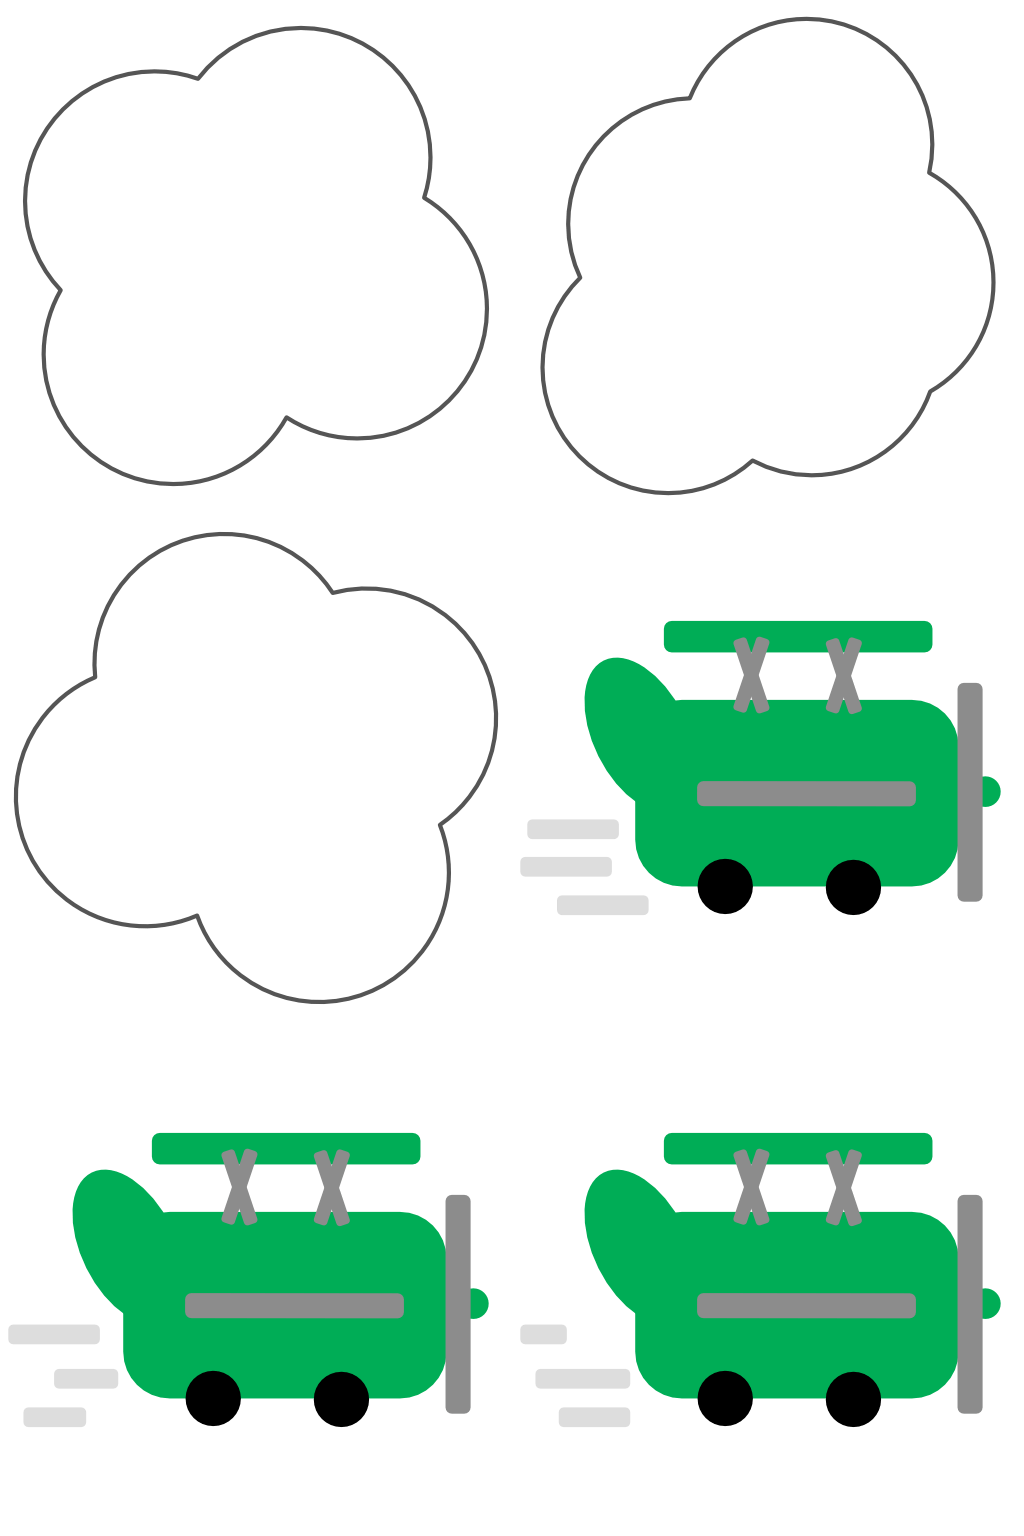
To get an idea of what we plan to accomplish, take a look at the following animated image:

In the above image you’ll notice an animate sprite that looks like a plane. The plane is not the focus of this example, but it does make it look a little more interesting. Instead, we’re interested in the coins that are moving across the screen. These coins are sprites that are part of an object pool. As they move off the screen, they are added back into the pool.
If you’d like to learn more about how the plane was animated, check out my previous tutorial titled, Animate Spritesheets in a Phaser Game.
Create a New Phaser 3.x Project for the Game
To keep this example simple and easy to understand, we’re going to start with a fresh project. On your computer, create a new directory with an index.html file inside. Within this index.html file, add the following HTML markup:
<!DOCTYPE html>
<html>
    <head>
        <script src="//cdn.jsdelivr.net/npm/phaser@3.24.1/dist/phaser.min.js"></script>
    </head>
    <body>
        <div id="game"></div>
        <script>

            const phaserConfig = {
                type: Phaser.AUTO,
                parent: "game",
                width: 1280,
                height: 720,
                backgroundColor: "#5DACD8",
                scene: {
                    init: initScene,
                    preload: preloadScene,
                    create: createScene,
                    update: updateScene
                }
            };

            const game = new Phaser.Game(phaserConfig);

            var plane, bitcoinGroup;

            function initScene() {}
            function preloadScene() {}
            function createScene() {}
            function updateScene() {}

        </script>
    </body>
</html>
The above code will load the Phaser framework and create a new game with some basic configuration. We’re going to be populating each of the scene lifecycle functions with animation and object pooling code.
Since this example uses some media assets, I’m going to provide what I’m using. You can download the spritesheet and the coin, or you can create and use your own.
With the media assets in the same directory as your index.html file, modify the preloadScene function to look like the following:
function preloadScene() {
    this.load.spritesheet("plane", "plane.png", { frameWidth: 512, frameHeight: 512 });
    this.load.image("bitcoin", "bitcoin.png");
}
If you’re using your own media assets, make sure to swap what I have with yours.
Within the createScene function, let’s render and animate the plane sprite, but not touch the coin because the coin will be used as part of our object pool.
function createScene() {

    this.anims.create({
        key: "fly",
        frameRate: 7,
        frames: this.anims.generateFrameNumbers("plane", { start: 3, end: 5 }),
        repeat: -1
    });

    plane = this.add.sprite(256, 360, "plane");
    plane.setScale(0.3);
    plane.setDepth(1);
    plane.play("fly");

}
The above code will animate our sprite based on the spritesheet that I had provided. If you’re using your own, your code might be different. In reality, you don’t even need to animate your sprite for this example because the focus is not sprite animations. If you want to learn more about animating spritesheets, check out my previous tutorial on the subject.
We’re ready to start working with an object pool!
Creating, Using, and Refilling the Sprite Object Pool
Working with an object pool isn’t much different from working with a single sprite in Phaser. The main difference is how we create and destroy these sprites for performance factors.
Within the createScene function of the index.html file, change it to look like the following:
function createScene() {

    // Animation and plane logic ...

    bitcoinGroup = this.add.group({
        defaultKey: "bitcoin",
        maxSize: 15,
        visible: false,
        active: false
    });

    this.time.addEvent({
        delay: 500,
        loop: true,
        callback: () => {
            let bitcoinPosition = Math.floor(Math.random() * 3);
            bitcoinGroup.get(1300, [125, 360, 595][bitcoinPosition])
                .setActive(true)
                .setVisible(true)
                .setScale(0.15);
        }
    });

}
The above code can be broken into two pieces of logic. The first being how we add objects to a group with a specific configuration.
bitcoinGroup = this.add.group({
    defaultKey: "bitcoin",
    maxSize: 15,
    visible: false,
    active: false
});
What we’re saying is to give each object in this group the bitcoin image that we defined in the preloadScene function. We’re saying that a maximum of 15 objects should be in this pool and when they are created they should be inactive and invisible.
So now we have an object pool of invisible and inactive objects.
The next part of the code will actually pull items from the object pool for use:
this.time.addEvent({
    delay: 500,
    loop: true,
    callback: () => {
        let bitcoinPosition = Math.floor(Math.random() * 3);
        bitcoinGroup.get(1300, [125, 360, 595][bitcoinPosition])
            .setActive(true)
            .setVisible(true)
            .setScale(0.15);
    }
});
Using a timer that loops, we come up with a random number to represent the position of our coin. Then we are using the get function on our group to pull an object from our pool and give it a position within the game. We’re using an array for the y-axis because we want to use the random number to pick one of three possible y-axis locations. In this example, the x-axis will always be 1300 for the coin, but the y-axis can be either 125, 360, or 595, depending on what the random number is. In this case, the random number is the index for that array.
When we pull an object from the object pool in Phaser, we are setting it to active and we are changing the visibility. We only want active objects to be visible. We’re setting the scale because the images I provided are quite large and need to be scaled down.
Now that we have a timer pulling objects from the pool, we might want to move them.
Change the updateScene function of the index.html file to the following:
function updateScene() {
    bitcoinGroup.incX(-8);
    bitcoinGroup.getChildren().forEach(bitcoin => {
        if (bitcoin.active && bitcoin.x < 0) {
            bitcoinGroup.killAndHide(bitcoin);
        }
    });
}
In the above code we are decreasing every object in the object pool along the x-axis. Even though the entire pool is moving, that doesn’t mean that all objects are visible and active.
Because we don’t want objects to scroll forever off the screen and deplete our pool, we need to add them back to the pool when they scroll off the screen. Using the loop we are looking at every object in the pool. If the object is active and the position is less than we want, instead of destroying the object, we are just adding it back.
If the object pool depletes and you try to continue pulling objects, you’ll get an error that the objects don’t exist. If you know you need more objects, it might make sense to create a larger pool.
Conclusion
You just saw how to do object pooling in a Phaser 3.x game. While it may not seem important, object pooling is pretty much a requirement if you want to have a high performance game. Remember, just because the game runs smooth on your computer or device, doesn’t mean everyone will have the same experience. So rather than creating and destroying objects as necessary, it’s best to retrieve objects from an object pool when needed and put them back when they are not needed.
The great thing about object pooling is that it works flawlessly with physics and collisions in the game. To learn about how to check for collisions, check out my previous tutorial on the subject titled, Handle Collisions Between Sprites in Phaser with Arcade Physics.
If you’re interested in object pooling with a framework like Unity instead of Phaser, check out this other tutorial I wrote on the subject.

Nic Raboy
Nic Raboy is an advocate of modern web and mobile development technologies. He has experience in C#, JavaScript, Golang and a variety of frameworks such as Angular, NativeScript, and Unity. Nic writes about his development experiences related to making web and mobile development easier to understand.
Follow Us

Support This Site
If you found this developer resource helpful, please consider supporting it through the following options:


