Getting Started with the Realm SDK for Unity
Did you know that MongoDB has a Realm SDK for the Unity game development framework that makes working with game data effortless? The Realm SDK is currently an alpha release, but you can already start using it to build persistence into your cross platform gaming projects.
A few weeks ago I streamed about and wrote about creating an infinite runner type game using Unity and the Realm SDK for Unity. Realm was used for storing the score between scenes and sessions within the game.
There were a lot of deep topics in the infinite runner (think Temple Run or Subway Surfer) example, so I wanted to take a step back. In this tutorial, we’re going to spend less time making an interesting game and more time including and using Realm within a Unity project.
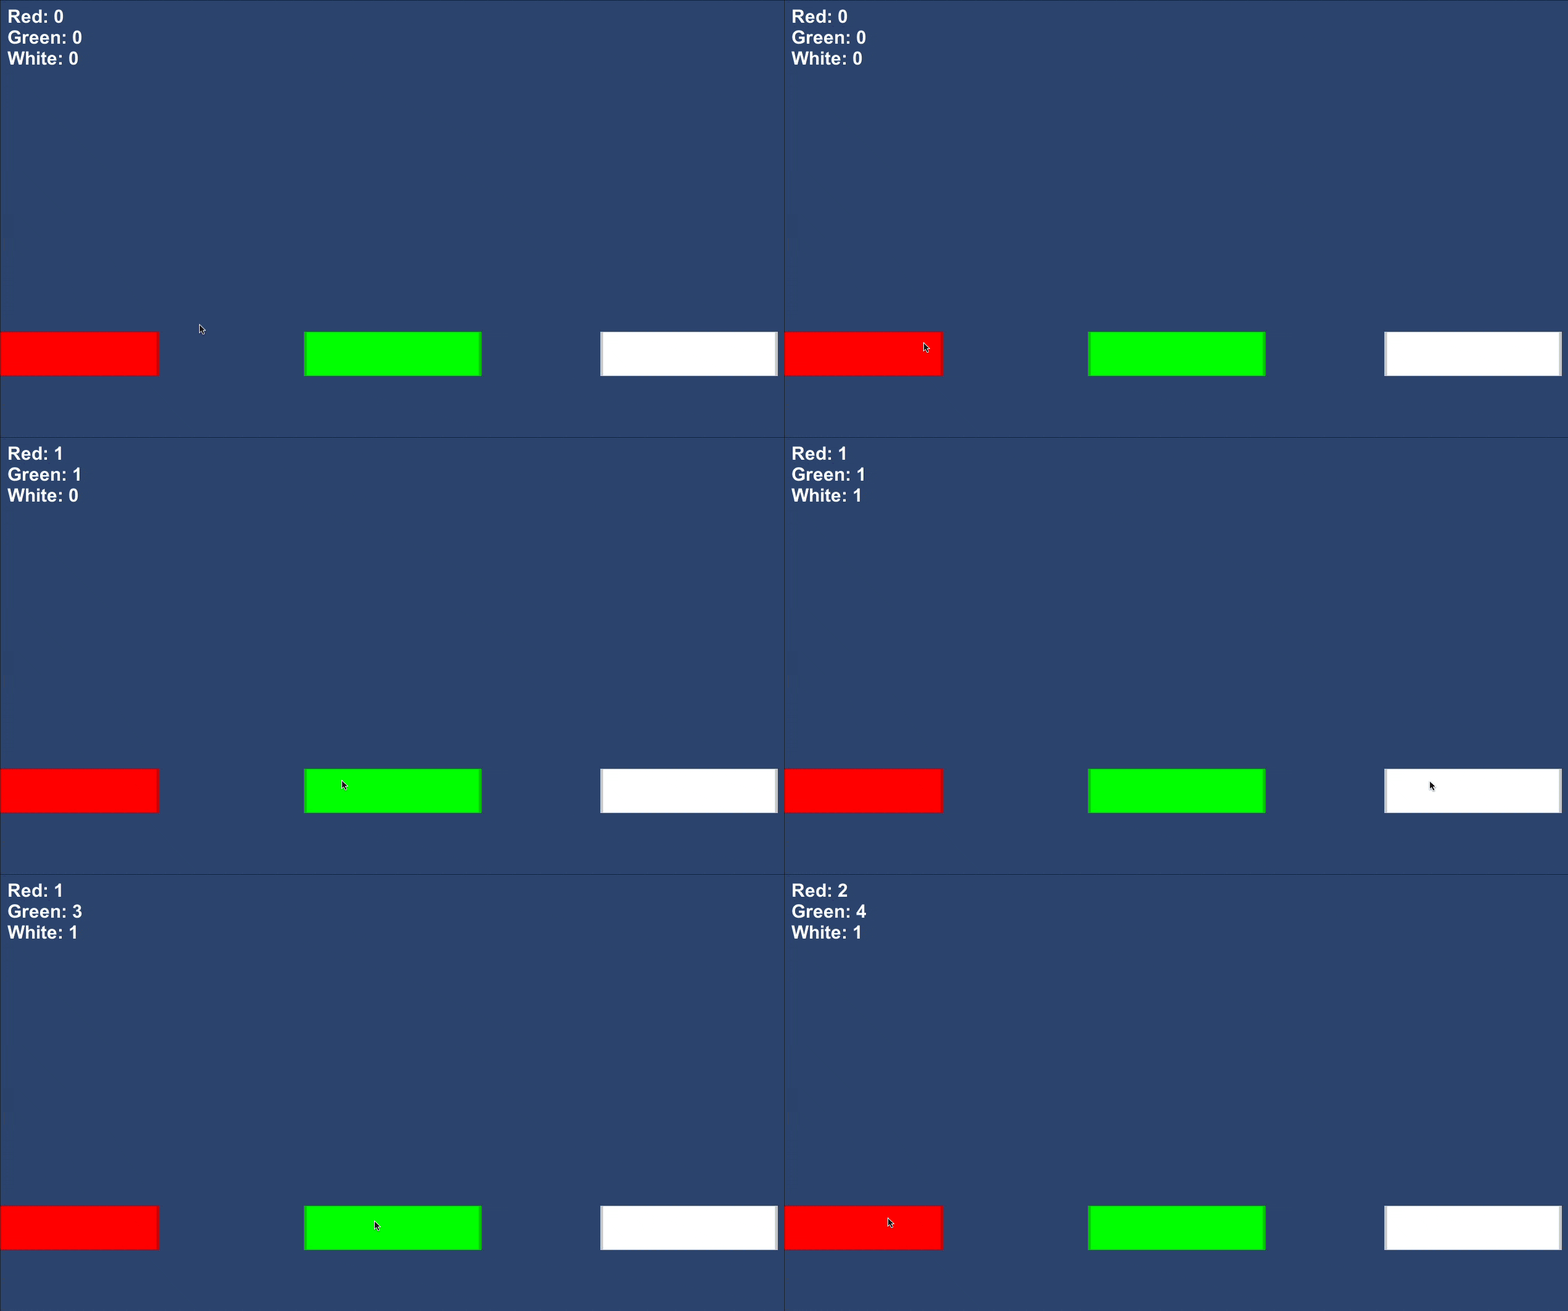
To get an idea of what we’re going to accomplish, take a look at the following animated image:

In the above example, we have three rectangles, each of a different color. When clicking our mouse on a rectangle, the numeric values increase. If the game were to be closed and then opened again, the numeric values would be retained.
The Requirements
There aren’t many requirements to using Realm with Unity, and once Realm becomes production ready, those requirements will be even less. However, for now you need the following:
- Unity 2020.2.4f1+
- Realm SDK for Unity 10.1.1+
For now, the Realm SDK for Unity needs to be downloaded and imported manually into a project. This will change when the SDK can be added through the Unity Asset Store.
When you download Unity, you’ll likely be using a different and potentially older version by default. Within the Unity Hub software, pay attention to the version you’re using and either upgrade or downgrade as necessary.
Adding the Realm SDK for Unity to a Project
From GitHub, download the latest Realm SDK for Unity tarball. If given the option, choose the bundle file. For example, realm.unity.bundle-10.1.1.tgz is what I’m using.
Create a new Unity project and use the 2D template when prompted.
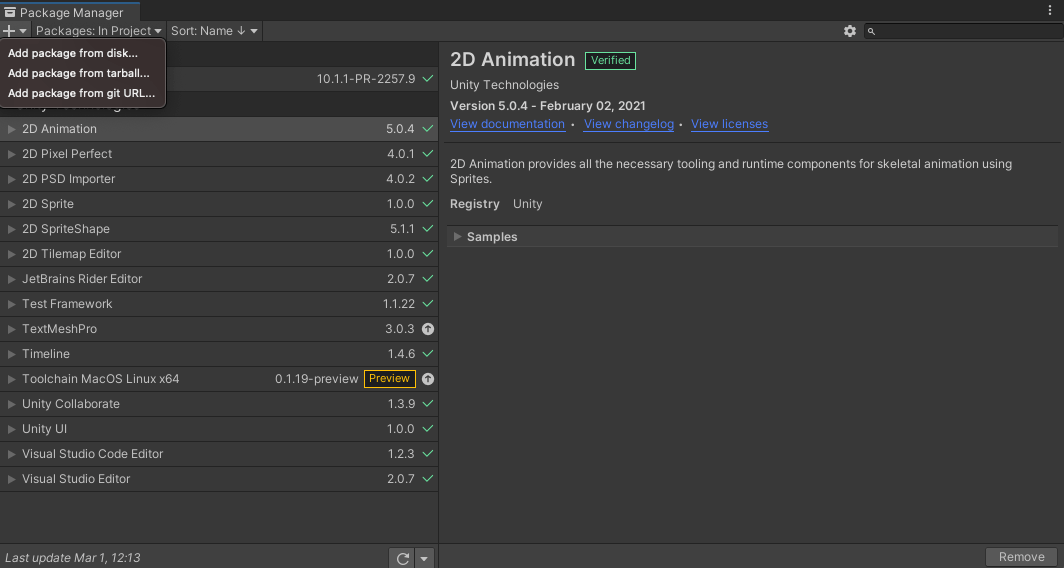
Within a Unity project, choose Window -> Package Manager and then click the plus icon to add a tarball.

The process of importing the tarball should only take a minute or two. Once it has been added, it is ready for use within the game. Do note that adding the tarball to your project only adds a reference based on its current location on your disk. Moving or removing the tarball on your filesystem will break the link.
Designing a Data Model for the Realm Objects Within the Game
Before we can start persisting data to Realm and then accessing it later, we need to define a model of what our data will look like. Since Realm is an object-oriented database, we’re going to define a class with appropriate member variables and methods. This will represent what the data looks like when persisted.
To align with the basic example that we’re interested in, we essentially want to store various score information.
Within the Unity project, create a new script file titled GameModel.cs with the following C# code:
using Realms;

public class GameModel : RealmObject {

    [PrimaryKey]
    public string gamerTag { get; set; }

    public int redScore { get; set; }
    public int greenScore { get; set; }
    public int whiteScore { get; set; }

    public GameModel() { }

    public GameModel(string gamerTag, int redScore, int greenScore, int whiteScore) {
        this.gamerTag = gamerTag;
        this.redScore = redScore;
        this.greenScore = greenScore;
        this.whiteScore = whiteScore;
    }

}
The redScore, greenScore, and whiteScore variables will keep the score for each square on the screen. Since a game is usually tied to a person or a computer, we need to define a primary key for the associated data. The Realm primary key uniquely identifies an object within a Realm. For this example, we’re use a gamerTag variable which represents a person or player.
To get an idea of what our model might look like as JSON, take the following:
{
    "gamerTag": "poketrainernic",
    "redScore": 0,
    "greenScore": 0,
    "whiteScore": 0
}
For this example, and many Realm with Unity examples, we won’t ever have to worry about how it looks like as JSON since everything will be done locally as objects.
With the RealmObject class configured, we can make use of it inside the game.
Interacting with Persisted Realm Data in the Game
The RealmObject only represents the storage model for our data. There are extra steps when it comes to interacting with the data that is modeled using it.
Within the Unity project, create a GameController.cs file with the following C# code:
using System.Collections;
using System.Collections.Generic;
using UnityEngine;
using Realms;
using UnityEngine.UI;

public class GameController : MonoBehaviour {

    private Realm _realm;
    private GameModel _gameModel;

    public Text scoreText;

    void OnEnable() {
        _realm = Realm.GetInstance();
        _gameModel = _realm.Find<GameModel>("poketrainernic");
        if(_gameModel == null) {
            _realm.Write(() => {
                _gameModel = _realm.Add(new GameModel("poketrainernic", 0, 0, 0));
            });
        }
    }

    void OnDisable() {
        _realm.Dispose();
    }

    public void SetButtonScore(string color, int inc) {
        switch(color) {
            case "RedSquare":
                _realm.Write(() => {
                    _gameModel.redScore++;
                });
                break;
            case "GreenSquare":
                _realm.Write(() => {
                    _gameModel.greenScore++;
                });
                break;
            case "WhiteSquare":
                _realm.Write(() => {
                    _gameModel.whiteScore++;
                });
                break;
            default:
                Debug.Log("Color Not Found");
                break;
        }
    }

    void Update() {
        scoreText.text = "Red: " + _gameModel.redScore + "\n" + "Green: " + _gameModel.greenScore + "\n" + "White: " + _gameModel.whiteScore;
    }

}
In the above code, we have a few things going on, all related to interacting with Realm.
In the OnEnable method, we are getting an instance of our Realm database and we are finding an object based on our GameModel class. The primary key is the gamerTag string variable, so we are providing a value to query on. If the query returns a null value, it means that no data exists based on the primary key used. In that circumstance, we create a Write block and add a new object based on the constructor within the GameModel class. By the end of the query or creation of our data, we’ll have a _gameModel object that we can work with in our game.
We’re hard coding the “poketrainernic” value because we don’t plan to use any kind of authentication in this example. Everyone who plays this game is considered the “poketrainernic” player.
The OnDisable method is for cleanup. It is important to dispose of the Realm instance when the game ends to prevent any unexpected behavior.
For this particular game example, most of our logic happens in the SetButtonScore method. In the SetButtonScore method, we are checking to see which color should be incremented and then we are doing so. The amazing thing is that changing the _gameModel object changes what is persisted, as long as the changes happen in a Write block. No having to write queries or do anything out of the ordinary beyond just working with your objects as you would normally.
While we don’t have a Text object configured yet within our game, the Update method will update the text on the screen every frame. If one of the values in our Realm instance changes, it will be reflected on the screen.
Adding Basic Logic to the Game Objects Within the Scene
At this point, we have a RealmObject data model for our persisted data and we have a class for interacting with that data. We don’t have anything to tie it together visually like you’d expect in a game. In other words, we need to be able to click on a colored sprite and have it persist something new.
Within the Unity project, create a Button.cs file with the following C# code:
using System.Collections;
using System.Collections.Generic;
using UnityEngine;

public class Button : MonoBehaviour {

    public GameController game;

    void OnMouseDown() {
        game.SetButtonScore(gameObject.name, 1);
    }

}
The game variable in the above code will eventually be from a game object within the scene and configured through a series of dragging and dropping, but we’re not there yet. As of right now, we’re focusing on the code, and less on game objects.
The OnMouseDown method is where the magic happens for this script. The game object that this script will eventually be attached to will have a collider which gives us access to the OnMouseDown method. When the game object is clicked, we use the SetButtonScore method to send the name of the current game object as well as a value to increase the score by. Remember, inside the SetButtonScore method we are expecting a string value for our switch statement. In the next few steps, naming the game objects appropriately is critical based on our already applied logic.
If you’re not sure where gameObject is coming from, it is inherited as part of the MonoBehavior class, and it represents the current game object to which the script is currently attached to.
Game Objects, Colliders, and the Gaming Wrap-Up
The Unity project has a bunch of short scripts sitting out in the ether. It’s time to add game objects to the scene so we can attach the scripts and do something interesting.
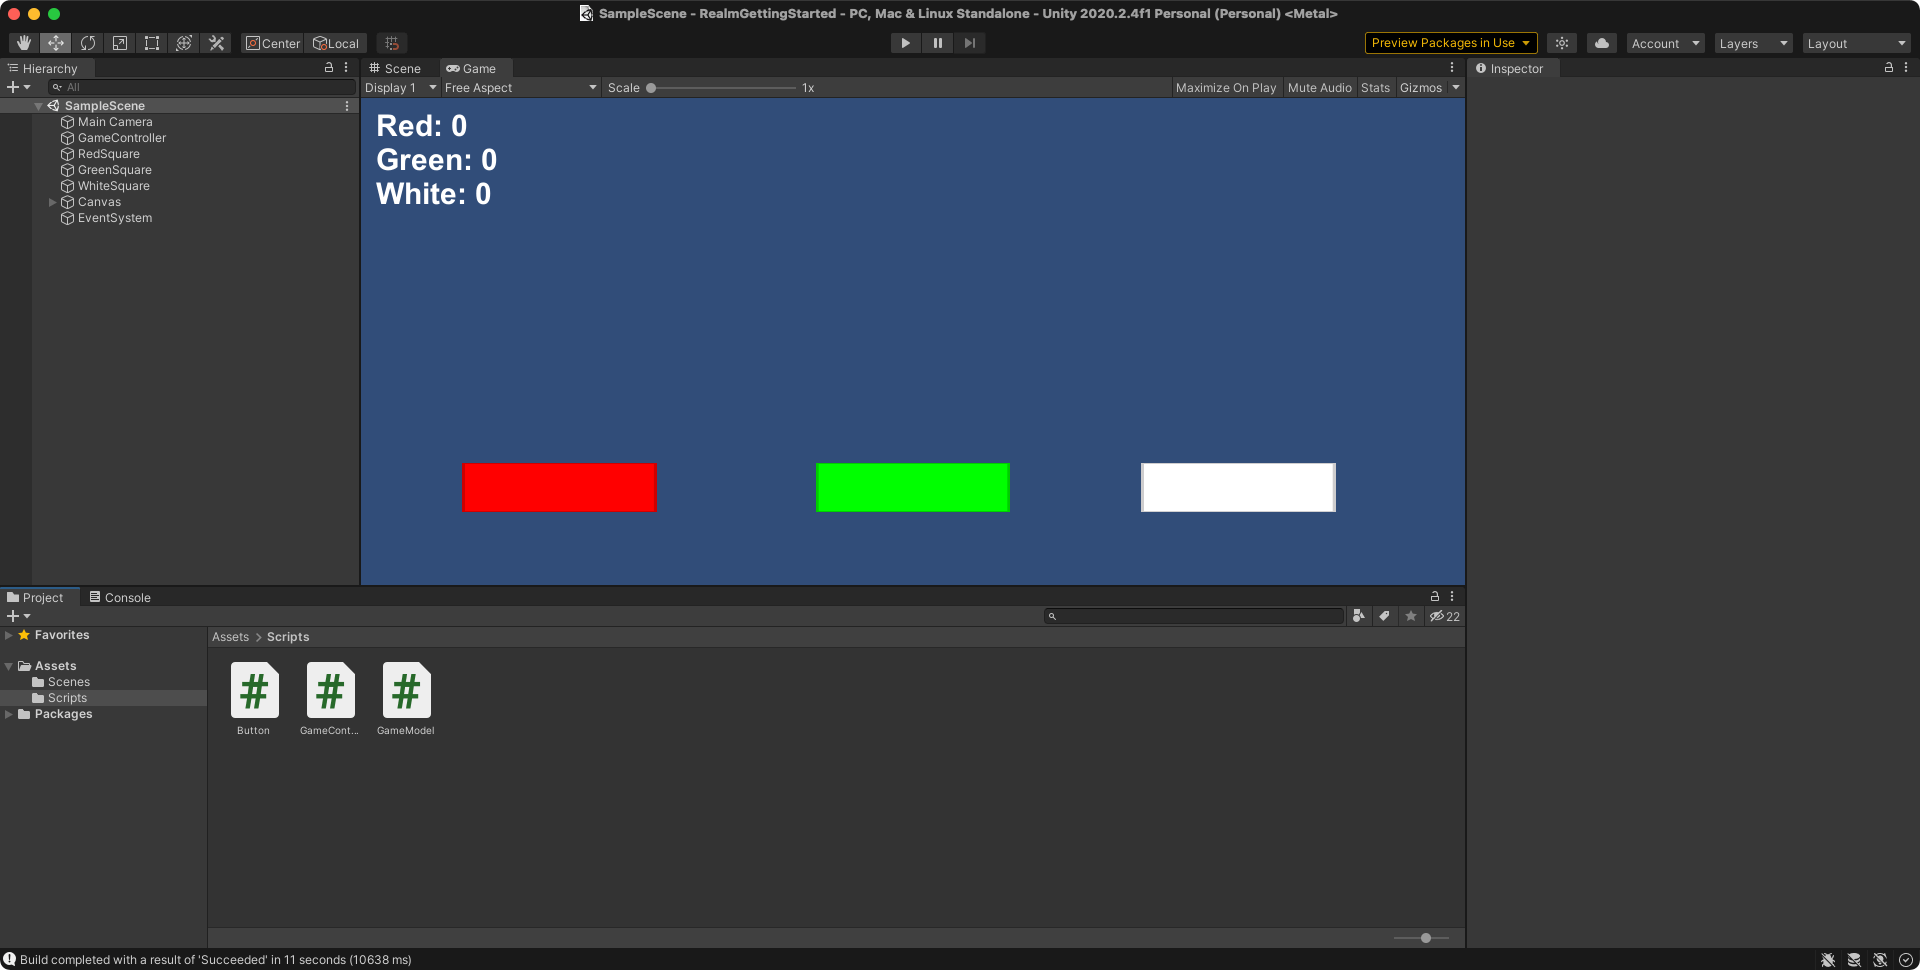
By the time we’re done, our Unity editor should look something like the following:

We need to add a few game objects, add the scripts to those game objects, then reference a few other game objects. Yes, it sounds complicated, but it really isn’t!
Within the Unity editor, add the following game objects to the scene. We’ll walk through adding them and some of the specifics next:
- GameController
- RedSquare
- GreenSquare
- WhiteSquare
- Canvas
- Scores
- EventSystem
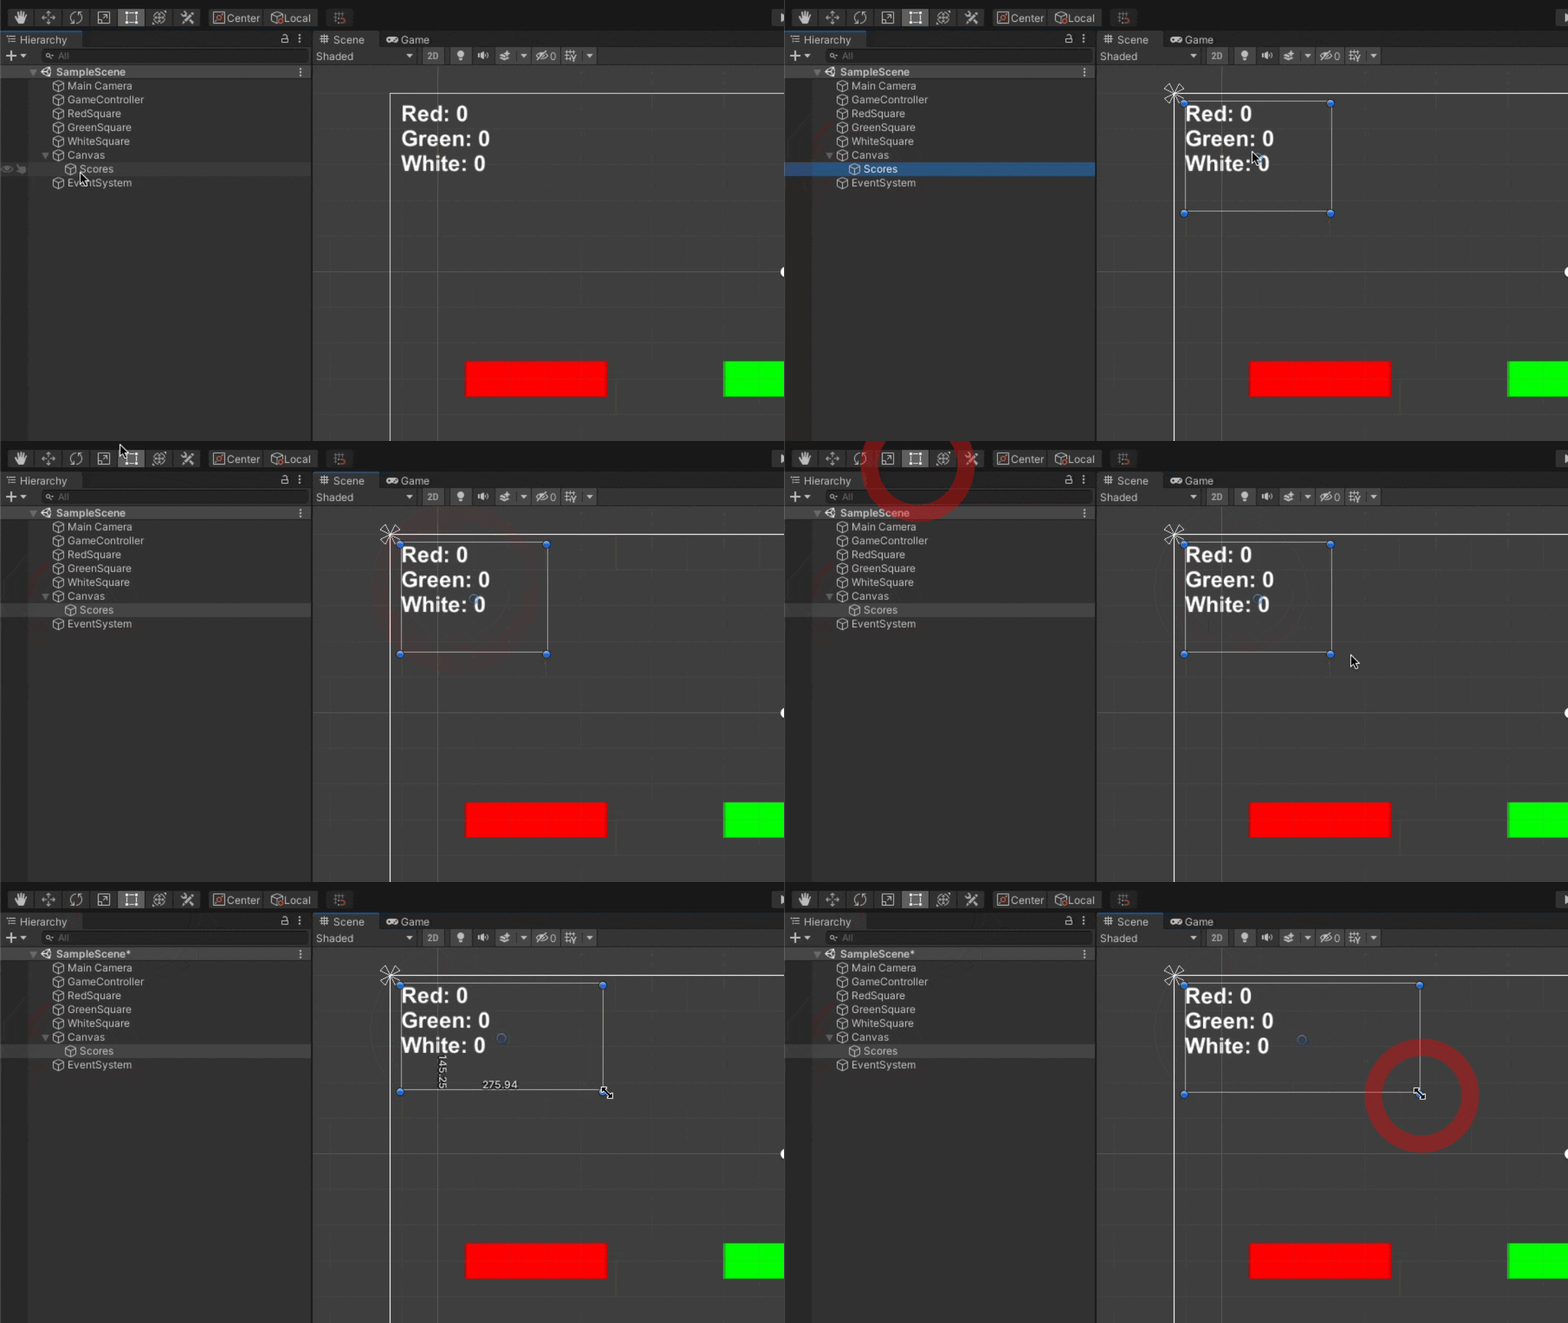
Now the Scores game object is for our text. You can add a Text game object from the menu and it will add the Canvas and EventSystem for you. You don’t need to add a Canvas or EventSystem manually if Unity created one for you. Just make sure you name and position the game object for scores appropriately.
If the Scores text is too small or not visible, make sure the rectangular boundaries for the text is large enough.

The RedSquare, GreenSquare, and WhiteSquare game objects are Square sprites, each with a different color. These sprites can be added using the GameObject -> 2D Object -> Sprites -> Square menu item. You’ll need to rename them to the desired name after adding them to the scene. Finally, the GameController is nothing more than an empty game object.
Drag the Button.cs script to the inspector panel of each of the colored square sprites. The sprites depend on being able to access the SetButtonScore method, so the GameController game object must be dragged onto the Score Text field within the script area on each of the squares as well. Drag the GameController.cs script to the GameController game object. Next, drag the Scores game object into the scripts section of the GameController game object so that the GameController game object can control the score text.
We just did a lot of drag and drop on the game objects within the scene. We’re not quite done yet though. In order to use the OnMouseDown method for our squares, they need to have a collider. Make sure to add a Box Collider 2D to each of the squares. The Box Collider 2D is a component that can be added to the game objects through the inspector.
You should be able to run the game with success as of now! You can do this by either creating and running a build from the File menu, or by using the play button within your editor to preview the game.
Conclusion
You just saw how to get started with the Realm SDK for Unity. I wrote another example of using Realm with Unity, but the game was a little more exciting, which added more complexity. Once you have a firm understanding of how Realm works in Unity, it is worth checking out Build an Infinite Runner Game with Unity and the Realm Unity SDK.
As previously mentioned, the Realm SDK for Unity is currently an alpha release. Expect that there will be problems at some point, so it probably isn’t best to use it in your production ready game. However, you should be able to get comfortable including it.
For more examples on using the Realm SDK, check out the C# documentation.
Questions? Comments? We’d love to connect with you. Join the conversation on the MongoDB Community Forums.
This content first appeared on MongoDB.

